How to convert physical Windows PC into a virtual machine
After 10 years of running my main desktop computer on Windows 7 – time has finally come to upgrade it to Windows 10. Along with some hardware upgrades that my computer needed, I also wanted to move to the Windows 10 since the support and updates for Windows 7 will be discontinued on January 14th 2020.
Also, my 10 year old Windows 7 PC had a lot of settings and pieces of data that I didn’t want to give up that easily, so I got an idea to make a copy of the current Windows 7 as a virtual machine, so in case I need anything I could just boot the virtual machine and within seconds go back to my Windows 7 setup with all access all data and settings.
Making the virtual machine out of my Windows 7 PC
First step was to make a bootable copy of my computer’s hard drive partitions. For this purpose I used Disk2vhd tool made by Microsoft. It’s a free tool and all I needed to do is just pick partitions I want to backup and tell it where to back that up.
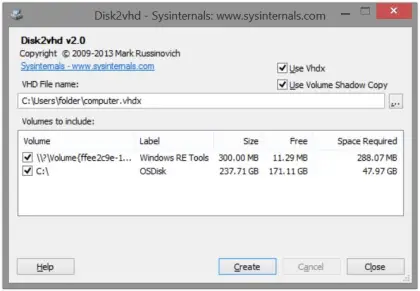
Ideally, you would want back this up on another drive (so the backup process is quicker since one drive just reads, while other one is just writing). My C: partition was 250gb and it was roughly 45% full and the result was a Windows7.vhdx file of roughly 100 GB in size. That was copy of my Windows 7 PC installation in one big file.
NOTE: If you plan on using VMware to run the virtual machine, I advise you to uncheck “Use Vhdx” checkbox shown on the image above. (You can find the explanation why in the text below).
Without even testing this setup I went to install Windows 10. I was so free to do this since I have installed it on another hard drive: on to the new NVMe drive while my old Windows 7 remained on SSD drive that I have detached and saved just in case the virtual machine backup is not working for any possible reason.
I have created Windows 10 bootable USB drive using Media Creation Tool and have started Windows 10 installation. The installation went smooth and within 20 minutes I had a new operating system!
Next, I have powered down the computer and attached the drive containing my Windows7.vhdx file and I tried to run it as I’ve read that Windows 10 now comes with it’s own virtualization software called Hyper-V.
How to enable Hyper-V on Windows 10?
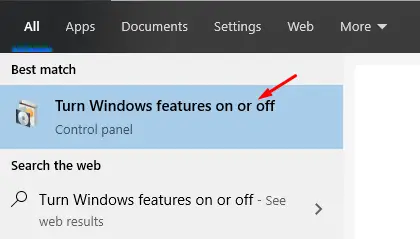
For some reason Hyper-V was not installed (or enabled) by default on Windows 10 so it has to be enabled.
To do so click on Start and in search enter this: Turn Windows features on or off and select the first result:
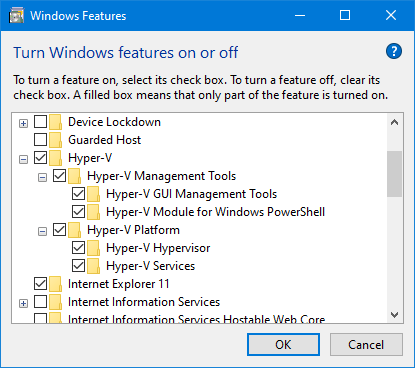
Then Locate Hyper-V in the list and enable all it’s checkboxes:
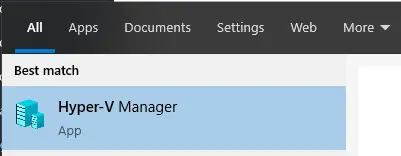
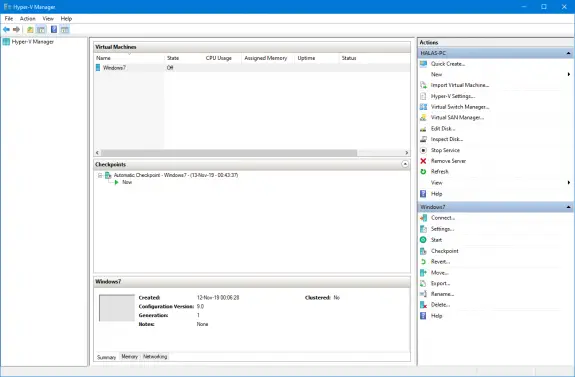
Now the Hyper-V Manager is available and you can run it by clicking start and typing Hyper-V and it will popup in the search:
Please note that Hyper-V requires 64-bit version of Windows (you can run your old 32-bit Windows inside a virtual machine, but the host computer has to be 64-bit). Also you’ll need a CPU that supports virtualization and a some extra memory (at least 8GB of RAM in my experience).
Why I had to move away from Hyper-V
Before this I had experiences with virtual machines. I mostly VMWare and VirtualBox to run other versions of Windows or Linux inside virtual machine but never had the experience with Hyper-V.
The first thing I noticed is that Hyper-V was quite slow to boot my old Windows 7 on a virtual machine. It would take couple of minutes before I could use it, while on VMware I could have it running in matter of seconds.
Next I was not able to plug a flash drive and copy files to it, since USB didn’t work for some reason, and the whole setup procedure was way too complicated for occasional use compared to VMware.
I managed to setup a shared folder so I could share files between my virtual machine running on Windows 7 and my host machine running on Windows 10 but I needed more and I desperately wanted to move this virtual machine to VMware or VirtualBox since I had it with Hyper-V.
How to convert your Hpyer-V virtual machine to VMware?
I’ve read a lot of posts on this topic and all these things either were too complicated or simply didn’t work – or both. These posts mostly suggested to do the conversion using VMware vCenter Converter or StarWind V2V Image Converter but neither would actually work in my case.
Than I found out that I could boot a .vhd file image into VMware, but I had .vhdx so I had to convert this 100 GB file from one format to another. I tried couple of tools (including WinImage) just to find out that it doesn’t work or it’s too complicated. The best way to do it is from the PowerShell with a simple command.
To convert .vhdx to .vhd start your Power Shell as Administrator

Now go to folder where your .vhdx file is located and execute the following command:
Convert-VHD -Path e:\Backup\Windows7.vhdx -DestinationPath e:\Backup\Windows7.vhd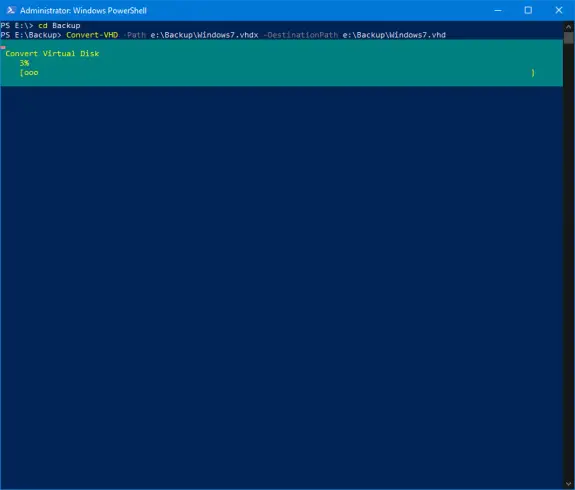
Now go prepare your self a cup of coffee, go do some workout, or have a lunch while the 100 GB file is converted. Again, what helps in this case is that both source and destination are not the same drives or that these are SSD/NVMe since these are lot faster than usual hard drives.
Creating a VMware custom virtual machine for .vhd file
Now we have the .vhd file, but how do we use it as virtual machine in VMware (since this is not a native format used by VMware).
Here is the step-by-step photo guide how to do this: it has 15 steps but don’t worry, most of these you’ll just click next anyway, so it’s nothing really complicated. So, let’s get started:
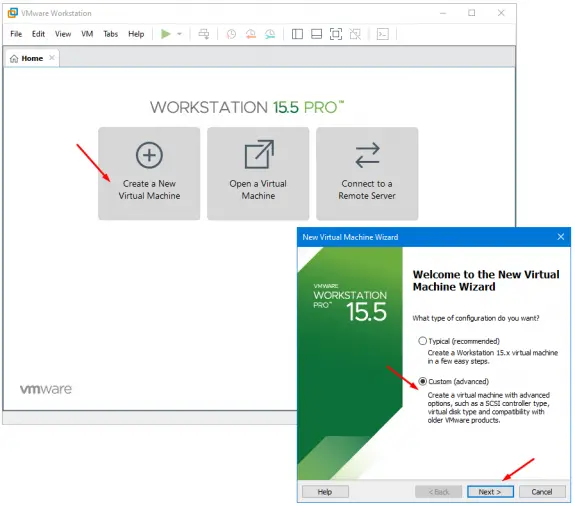
Step 1: Start VMware Workstation > click on Create a New Virtual Machine > pick Custom (Advanced) > click Next
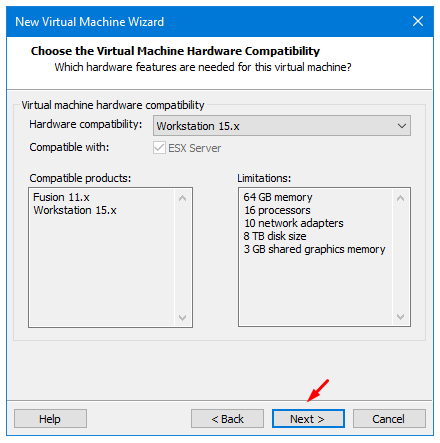
Step 2: Just click Next
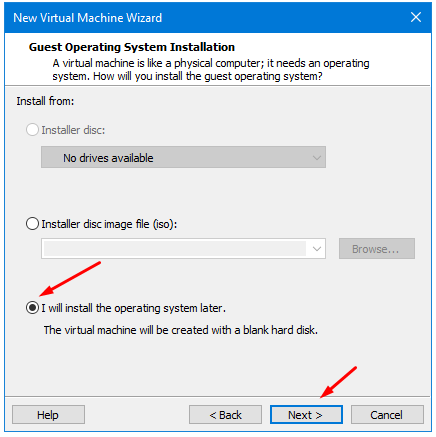
Step 3: Pick I will install the operating system later and click Next
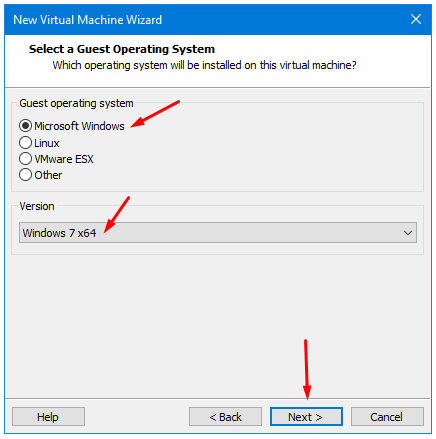
Step 4: Select Microsoft Windows > pick the correct version (of the operating system in the .vhd file) > click Next
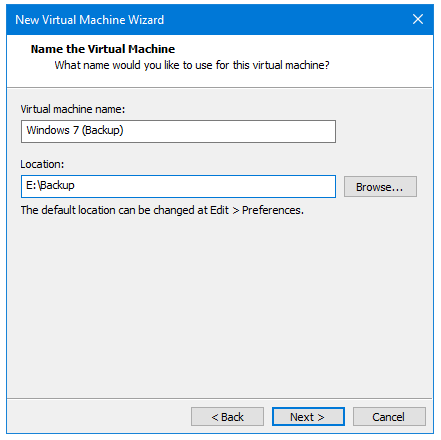
Step 5: Give a name to your virtual machine > pick a location > click Next
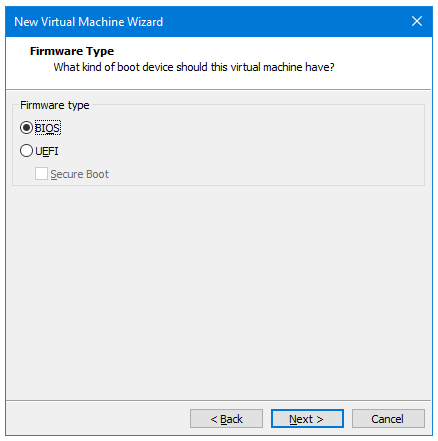
Step 6: Keep BIOS selected and just click Next
Step 7: Setup how much CPU power you want to allow this virtual machine to use (can be changed later) so just click Next

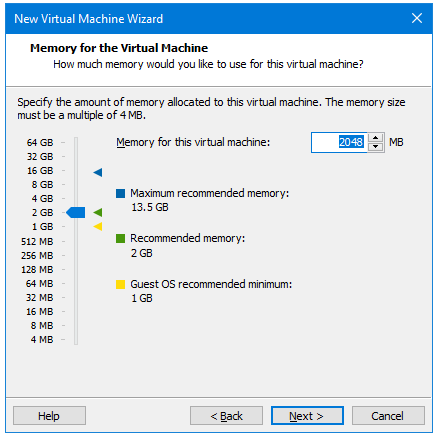
Step 8: Setup how much RAM memory can virtual machine use (can also be changed later) so just keep the default 2 GB and click Next
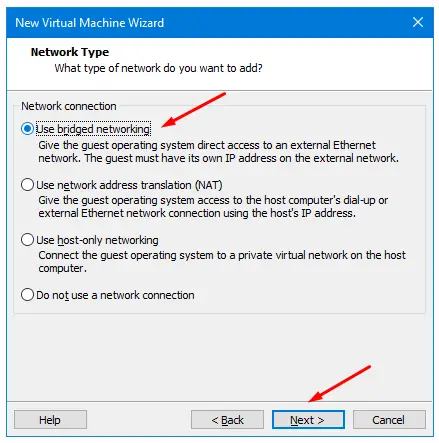
Step 9: Pick Use bridged networking and just click Next
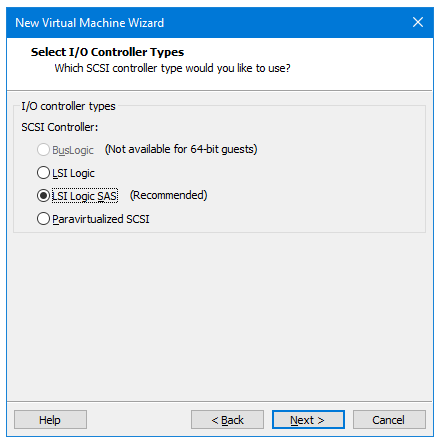
Step 10: Keep the default IO controller LSI Logic SAS and just click Next
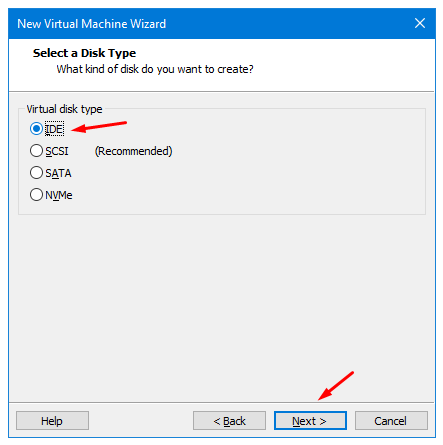
Step 11: Pick IDE disk type and click Next
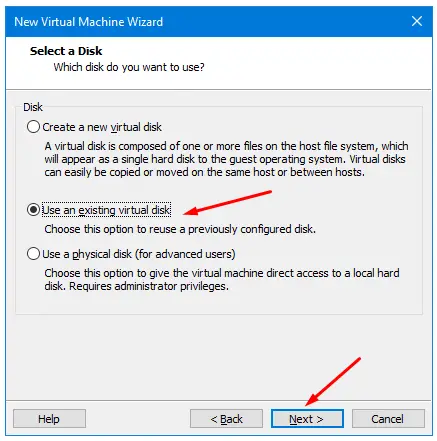
Step 12: This is an important step where you have to pick Use an existing virtual disk and press Next
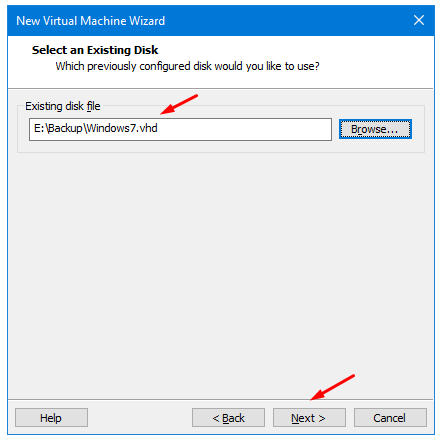
Step 13: Enter the path to the .vhd file (or click browse to find it) in Existing disk file and click Next
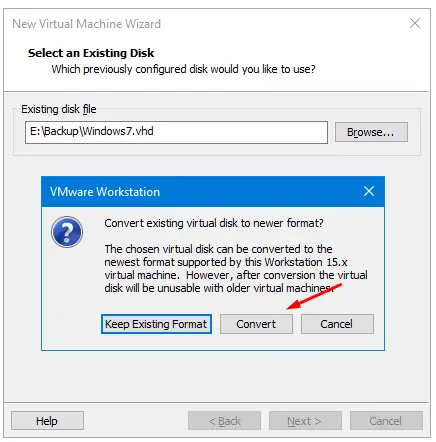
Step 14: After you click Next on previous step you get a prompt asking you do you want to keep this format or to convert it to new format. I have tried both and both: Keep existing Format and Convert and both will work but for the sake of this demo we’ll pick Convert.
Step 15: It’s finally done. And all the options that we have picked are here for us to preview. If you followed my guides all you need to do here is just click Finish
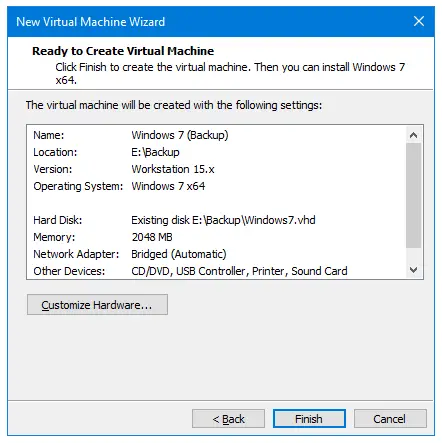
And that’s it! After 15 steps the virtual machine is created:
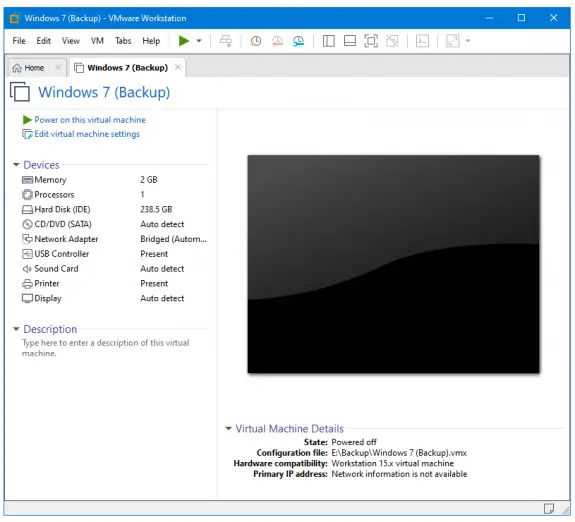
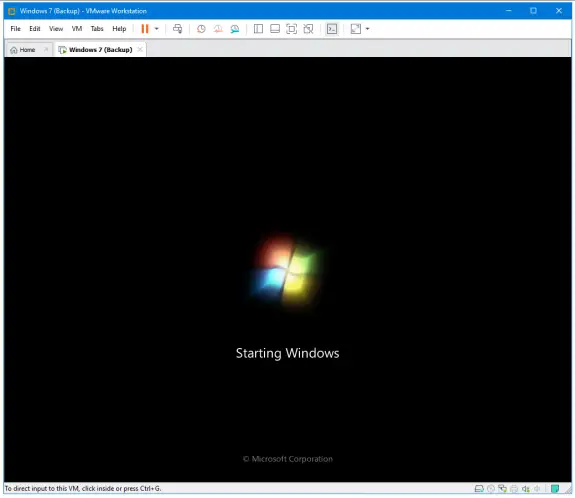
All you need to to is to Power it on:
It took me some time to figure this out. I’m not a virtual machine expert of any kind, but I managed to take my existing Windows 7 installed on my computer and to put it in a virtual machine. So now at a click of a button I can have it up and running and can access all of it’s settings and installed applications in case I need anything.
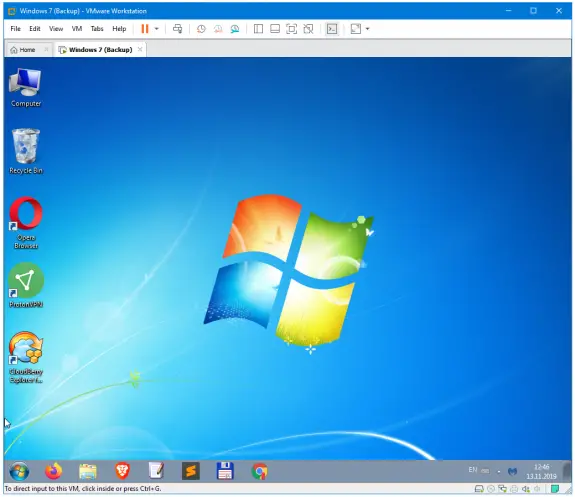
Also, on VMware I can drag’n’drop in files in and out virtual machine and also can use USB ports to connect USB flash drives or other devices that I might need.
Disabling Hyper-V is just a reverse process (uncheck the check boxes) described above, so in case you won’t be using it, you can just go and disable it.
This is also a great way how you can make a usable copy of your existing computer that you can then transfer or take with you or run it on a another computer. There are so many options.
It would be much easier if I have just unchecked the Use Vhdx box at Disk2vhd and that I have got the .vhd file directly instead of .vhdx and that would saved me one extra step in this process (conversion that can take 20 minutes or so).
Let me know what do you think about this post int he comments below. I hope this helps you out with converting your computer into a virtual machine. If you found this to be useful consider buying me a coffee 😉
Baizid
June 15, 2020 - 10:40 am
Just Awesome. You are always putting great stuff. I really appreciate that and follow your blogs. Thanks for updating such wonderful information.
Thanks!