How to DNS cache on Windows or macOS?
Almost all operating systems cache DNS records to improve the performance of applications and speed up internet access. Browsers do cache DNS records too and to flush these the easiest way is just to close the browser and start ti again. But sometimes there is a need to flush operating system DNS cache. Here’s how you can do that easily.
How to flush DNS cache on Windows XP / Windows Vista?
- Step 1: Open the Command Prompt
- Click on the Start Menu and click Run. Type in cmd and hit Enter.
- Step 2: Flush DNS
- Type ipconfig /flushdns and hit Enter.
How to flush DNS cache on Windows Vista or Windows 7?
- Step 1: Open the Command Prompt
- Click on the Start Menu and type cmd in the search bar and hit Enter.
- Step 2: Flush DNS
- Type ipconfig /flushdns and hit Enter.
How to flush DNS cache on Windows 8 or Windows 8.1?
- Step 1: Open the Command Prompt
- Hold Win key (windows logo key) and press letter X on your keyboard. Click on Command Prompt.
- Step 2: Flush DNS
- Type ipconfig /flushdns and hit Enter.
How to flush DNS cache on Windows 10?
- Step 1: Open the Command Prompt
- Hold Win key (windows logo key) and press letter X on your keyboard. Click on Command Prompt.
- Step 2: Flush DNS
- Type ipconfig /flushdns and hit Enter.
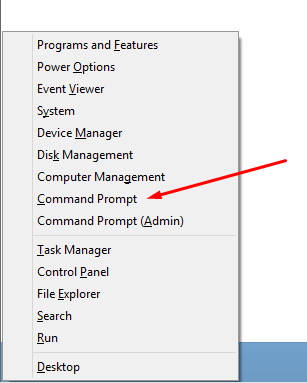
Starting Command Prompt in Windows 8 and Windows 10
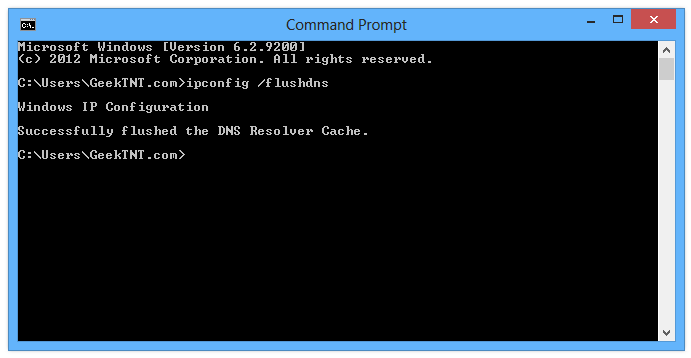
Flushing the DNS cache in Command Prompt
How to flush DNS cache on Mac OS X 10.6 Snow Leopard
- Step 1: Open the Terminal
- Navigate to Applications -> Utilities -> Terminal
- Step 2: Flush DNS
- Type sudo dscacheutil -flushcache and hit Return.
How to flush DNS cache on Mac OS X 10.7 Lion and Mac OS X 10.8 Mountain Lion
- Step 1: Open the Terminal
- Navigate to Applications -> Utilities -> Terminal
- Step 2: Flush DNS
- Type sudo killall -HUP mDNSResponder and hit Return.
How to flush DNS cache on Mac OS X 10.9 Mavericks
- Step 1: Open the Terminal
- Navigate to Applications -> Utilities -> Terminal
- Step 2: Flush DNS
- Type sudo killall -HUP mDNSResponder and hit Return.
How to flush DNS cache on Mac OS X 10.10 Yosemite
- Step 1: Open the Terminal
- Navigate to Applications -> Utilities -> Terminal
- Step 2: Flush DNS
- Type sudo killall -HUP mDNSResponder and hit Return.
How to flush DNS cache on Mac OS X 10.11 El Capetain
- Step 1: Open the Terminal
- Navigate to Applications -> Utilities -> Terminal
- Step 2: Flush DNS
- Type sudo dscacheutil -flushcache; sudo killall -HUP mDNSResponder; and hit Return.
How to flush DNS cache on macOS X 10.12 Sierra and macOS X 10.13 High Sierra
- Step 1: Open the Terminal
- Navigate to Applications -> Utilities -> Terminal
- Step 2: Flush DNS
- Type sudo dscacheutil -flushcache; sudo killall -HUP mDNSResponderHelper; and hit Return.
How to flush DNS cache on Linux
Most current Linux distributions do not use a DNS resolver cache in the same way that Windows and Mac OS X use. However, as a common DNS caching application sometimes used is the Name Service Caching Daemon (nscd) or . It’s most likely not installed by default so there is no need to flush the cache. But, if you’ve already installed it you can flush the cache by running the following command in a terminal:
- Step 1: Open the Terminal
- Depends on the Linux system you have
- Step 2: Flush DNS
- Type /etc/init.d/named restart and hit Enter or
- Type /etc/init.d/nscd restart and hit Enter (depending on the Linux distribution you have)
What’s DNS resolver cache?
Every time you visit a website or use any software that has access to the Internet (like Skype or WhatsApp) your browser, or that software, finds out on what actual IP address is the website (or server) that you are trying to access. It then stores this information for future use by creating a record consisting of one IP address and that domain name that points to that IP address is created within operating system. If you want to visit that same website again, the system already knows on what IP address it’s wastes no time trying to find that out saving you time. These records are cached for certain period of time and are called DNS Resolver Cache.
Why would anyone want to flush this cache?
Well sometimes IP addresses of some websites or servers may change and your DNS resolver cache might still keep the old IP address. This can result in your computer not being able to reach the website or it reaches an older copy of it. In some circumstances the data may become corrupt and accessing some websites might fail. So, cleaning your DNS cache is something you can try doing when you can’t access some site or in case you know that the website’s IP has changed. It’s also very helpful for web developers or web admins when migrating websites to a new server or IP (other way around is by modifying hosts file).
How can DNS Resolver Cache data be viewed?
Windows: from a command prompt type ipconfig /displaydns and hit enter. If there is too much data you can save that in a text file using this command: ipconfig /displaydns > dnscache.txt and that will create the dnscache.txt file in the current folder and fill it with the output.
Mac and Linux: I don’t know how to do it. If you do please leave a comment. Thank you!