If you have CSF firewall installed in cPanel you might noticed that you’re getting an email every time some process (usually a php script) uses more than 250MB of memory (default value) or more than 1800 secoonds (also default value).
These emails are being sent by LFD service that sends excessive resource usage alerts to the email address which is assigned to it, normally to root user account. This notification points out a particular process or service using excessive server resources and helps in identifying the resource eating process/service. We can either kill/stop the process/service to free the resource or allocate more resource to it, if necessary, increase the limits or simply do nothing and wait for it to finish it’s work.
Sample LFD email message when memory is exceeded:
—Time: Mon Nov 14 09:41:10 2016 +0530
—Account: xxxxxx
—Resource: Virtual Memory Size
—Exceeded: 205 > 200 (MB)
—Executable: /usr/bin/php
—Command Line: /usr/bin/php /home/xxxxxx/public_html/index.php
—PID: 26953 (Parent PID:24974)
—Killed: No
Sample LDF email message when execution time is exceeded:
—Time: Mon Nov 14 09:41:10 2016 +0530
—Account: xxxxxx
—Resource: Virtual Memory Size
—Exceeded: 125389 > 1800 (seconds)
—Executable: /usr/bin/php
—Command Line: /usr/bin/php /home/xxxxxx/public_html/index.php
—PID: 28429 (Parent PID:26561)
—Killed: No
Getting Started
1) Login to your WHM
2) Go to Home >> select Plugins
3) Click “ConfigServer Security & Firewall”
4) Locate and click at “Firewall Configuration” button
Method 1
This method will permanently disable the LFD excessive resource usage alert and you won’t receive any more emails. Performing this method could pose a a potential security/stability issue (you have been warned! 🙂 ).
5) Modify the value of directives PT_USERMEM and PT_USERTIME to 0.
PT_USERMEM = 0
PT_USERTIME = 0
Method 2
We will increase the values of both memory and time to stop or minimize the LFD alerts. If any process/service uses more resources than defined, you will still continue to receive the LFD alerts, but hopefully less.
5) Modify the value of directives PT_USERMEM and PT_USERTIME to desired.
PT_USERMEM = 500
PT_USERTIME = 150000
Finish
Save the changes you have made and restart CSF+LFD. By doing any of these two methods above should result in getting less or no email alerts from LFD.
While monitoring my system I have notices increased number of requests to xmlrpc.php. Every single of those requests took 200MB to 205MB of ram and resulted in system instability and in few occasions it caused my 8GB Digital Ocean Droplet to go out of memory and eventually crashed leaving all my sites not working for some 10hours or so.
Recently I’ve read that many hackers now use xmlrpc.php instead of wp-login.php to execute their brute force attacks. And the problem is – since WordPress 3.5 you can’t disable the use of xmlrpc, at least not from the WordPress control panel.
There are many ways to do that and I’ll write some:
1. Deleting xmlrpc.php file
This is really not recommended. Also after WordPress (auto)update the deleted file will be replaced so it’s not really smart to do this, but I just wanted to write this just in case someone doesn’t try to do this.
2. Plugins
There are several plugins that can do this. I found these two to be the most used ones: Disable XML-RPC and XML-RPC Pinkback. Both plugins are really basic (only couple lines of code) but they should be able to help you out and protect your blog against those attacks.
3. Adding filter to theme functions.php file
This is basically same thing as the plugin above, but you have one plugin less. All you need to do is to edit your theme’s functions.php and add these couple of lines:
function remove_x_pingback($headers) {
    unset($headers['X-Pingback']);
    return $headers;
}
add_filter('wp_headers', 'remove_x_pingback');
add_filter('xmlrpc_enabled', '__return_false');
4. Block access at .htaccess
You can simply add this one line of code to your .htaccess file and block the access to the xmlrpc.php file entirely. User accessing the xmlrpc.php will get the 403 Forbidden error.
<Files xmlrpc.php>
Order Deny,Allow
Deny from all
</Files>
5. Blocking access in nginx
If you are running nginx instead of Apache you should add this code to your nginx configuration:
server {
    location = /xmlrpc.php {
        deny all;
    }
}
6. Block on entire server
If you have one server or VPS with tens of hundreds of WordPress installations (like me) any of the solutions above will take time to implement. So the best thing to do is to block access to xmlrpc.php file on Apache level, simply by adding this to httpd.conf file:
<FilesMatch "^(xmlrpc\.php)">
Order Deny,Allow
Deny from all
</FilesMatch>
Or even better adding this code (that also blocks wp-trackback.php and also prevent’s trackback hacking attempts).
<FilesMatch "^(xmlrpc\.php|wp-trackback\.php)">
Order Deny,Allow
Deny from all
</FilesMatch>
If you don’t use XML-RPC than you can safely disable it using any of the methods above (except the first one, of-course) and protect your blog against xmlrpc hacks.
Few days ago I noticed the following error at CSF:
WARNING: RESTRICT_SYSLOG is disabled. See SECURITY WARNING in Firewall Configuration

Here is easy solution how to solve this:
1. Login to WHM
2. Home > Plugins> ConfigServer Security & Firewall > Firewall Configuration
3. Set RESTRICT_SYSLOG to 3 (which is the default value), save and restart CSF
Thats it!
What’s Heartbleed vulnerability (CVE-2014-0160)?
A serious OpenSSL vulnerability has been found, and is named Heartbleed and it affected all servers running OpenSSL versions from 1.0.01 to 1.0.1f. This vulnerability can be used to get the Private key of a SSL connection, so it is important to update / patch your server immediately. This bug is fixed in OpenSSL version 1.0.1g. All major Linux Distros have already released updates for Hartbleed vulnerability.
How to find out if your server is affected from Openssl Heartbleed vulnerability (CVE-2014-0160)?
Login to your SSH and execute following command to get the installed version number of OpenSSL:
openssl version
The result should be something like this:
openssl version
OpenSSL 1.0.1e 11 Feb 2013
If the version is below 1.0.1g your server might be vulnerable and you should patch it (see how below).
If your server is using a 0.9.8 release like it is used on Debian squeeze, then the server is not vulnerable as the HeartBleed function has been implemented in OpenSSL 1.0.1 and later versions only.
openssl version
OpenSSL 0.9.8o 01 Jun 2010
Fixing the Heartbleed vulnerability
CentOS and Fedora:
yum update
Ubuntu and Debian:
apt-get update
apt-get upgrade
OpenSUSE:
zypper update
Ok, now what?
After this you should restart all the services using OpenSSL but better idea is to restart the whole server just in case.
You can also verify on following site if you successfully closed the Heartbleed security hole on your server: http://filippo.io/Heartbleed/
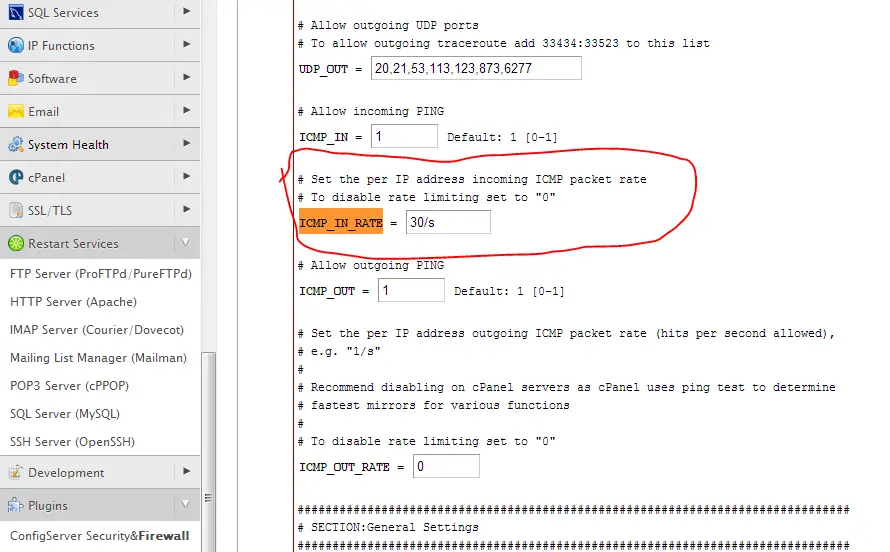
I use just-ping.com when I need to ping my servers from various locations in the world to see if it’s working right. I have noticed that when CSF Firewall is installed and active I get losts of lost packets when trying to ping the server, but when I disable it – results are okay. The solution for this is to increase the ICMP_IN_RATE value from 1/s to 30/s.
To do so login to your WHM go to ConfigServer Security & Firewall and there click on Firewall Configuration button and on that page locate ICMP_IN_RATE (CTRL+F can help you locate it) and then increase it’s value from 1/s to 30/s. Scroll all the way down and pres “Change” button to save the changes. Restart the firewall and test it again.
Here’s a screenshot of what you need to chage:

Now you should have good ping results at just-ping.com 🙂
04.12.2014 Update: Looks like the just-ping (now on new address cloudmonitor.ca.com) changed the way their service works. Now they ping you instantly from all places at once and CSF firewall will block most of these out and you’ll get lost packets in report. So for the testing you should set ICMP_IN_RATE to 0 – that will disable it – and then you can do tests. Other way around it to set it to fairly large number (200 or even bigger). Don’t forget to restart CSF + LFD in order these changes to apply.