So, this is actually the part 2 of my problems concerning DigitalOcean WordPress 1-click-app and JetPack (about the first issue you can read here). If you read my first post you found out what I had to do in order to activate the Jetpack. All seemed fine and I could see the stats from WordPress installed on DigitalOcean droplet on my WordPress.com account and even some of the active things were working (like Photon or Contact Form).
But, when I wanted to turn on some of the Jetpack modules that I have previously turned off (or that were turned off by default) it didn’t work. For example I wanted to turn off and then turn back on JSON API at General settings tab. When I turned it off it looked like it “worked” (no error messages) but when I wanted to turn it back on I was getting following error message (and the slider won’t go to active position):
JSON API failed to activate. SyntaxError: Unexpected toket < in JSON at position 0

When trying to activate some other Jetpack module I would also get this error:
SyntaxError: JSON Parse error: Unrecognized token ‘<‘” error
I was also unable to disconnect the Jetpack using the WordPress.com account and this was only possible if I would disable Jetpack at plugins and re-enable it again. Then I would have to re-connect it with my WordPress account and it’s a loop but the results were the same. It didn’t work!
I have contacted Jetpack support but their help was similar to Microsoft support (restart the computer and try again), or in Jetpack case: disable all plugins and try reconnecting again. Since Jetpack support was unable to help me after we have exchanged couple of emails I have decided to dig deeper into this on my own. DigitalOcean community also wasn’t helpful since I found just one comment about someone having the same problem as I do but there were no reply or solution.
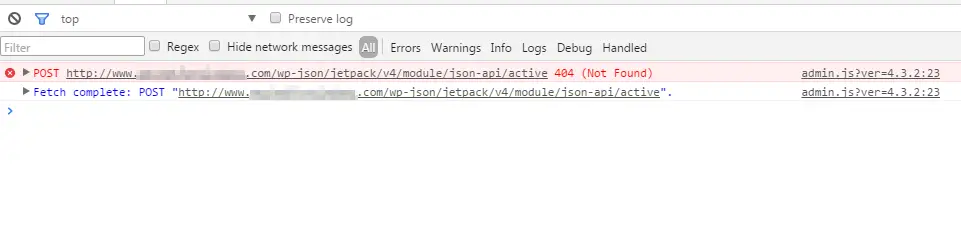
So I have opened Chrome debugger and have noticed that when I try to activate the JSON API it actually tries to make a POST call to url: /wp-json/jetpack/v4/module/json-api/activate:
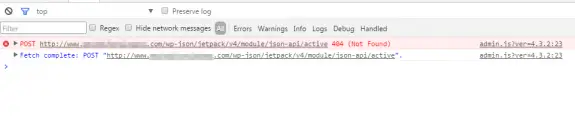
and the result is 404 – the standard 404 page! Since there files on that path and WordPress installation doesn’t have wp-json folder at all I figured out that this is mod_rewrite path so I knew in what direction to focus my exploration. I’d like to mention here that this also happened on brand new, zero days blogs, no plugins installed, default theme: basically on out of the box WordPress installations. Also permalinks worked so mod_rewrite was working normally (or it appeared to be working normally), and that made the situation even more confusing.
Out of pure despair I tried re-enabling mod_rewrite and restarting apache:
sudo a2enmod rewrite
sudo service apache2 restart
And it FU*KIN WORKED!!!
I have tired this on my other 5 or 6 sites hosted on DigitalOcean and it worked on all of them! I hope that some one from Jetpack or some geeks from DigitalOcean will see this post. I’d love to hear more about this issue. How is possible that mod_rewrite is working without being enabled on Apache or if it’s enabled why it doesn’t work for Jetpack plugin? I’m puzzled and I’d like some explanation.
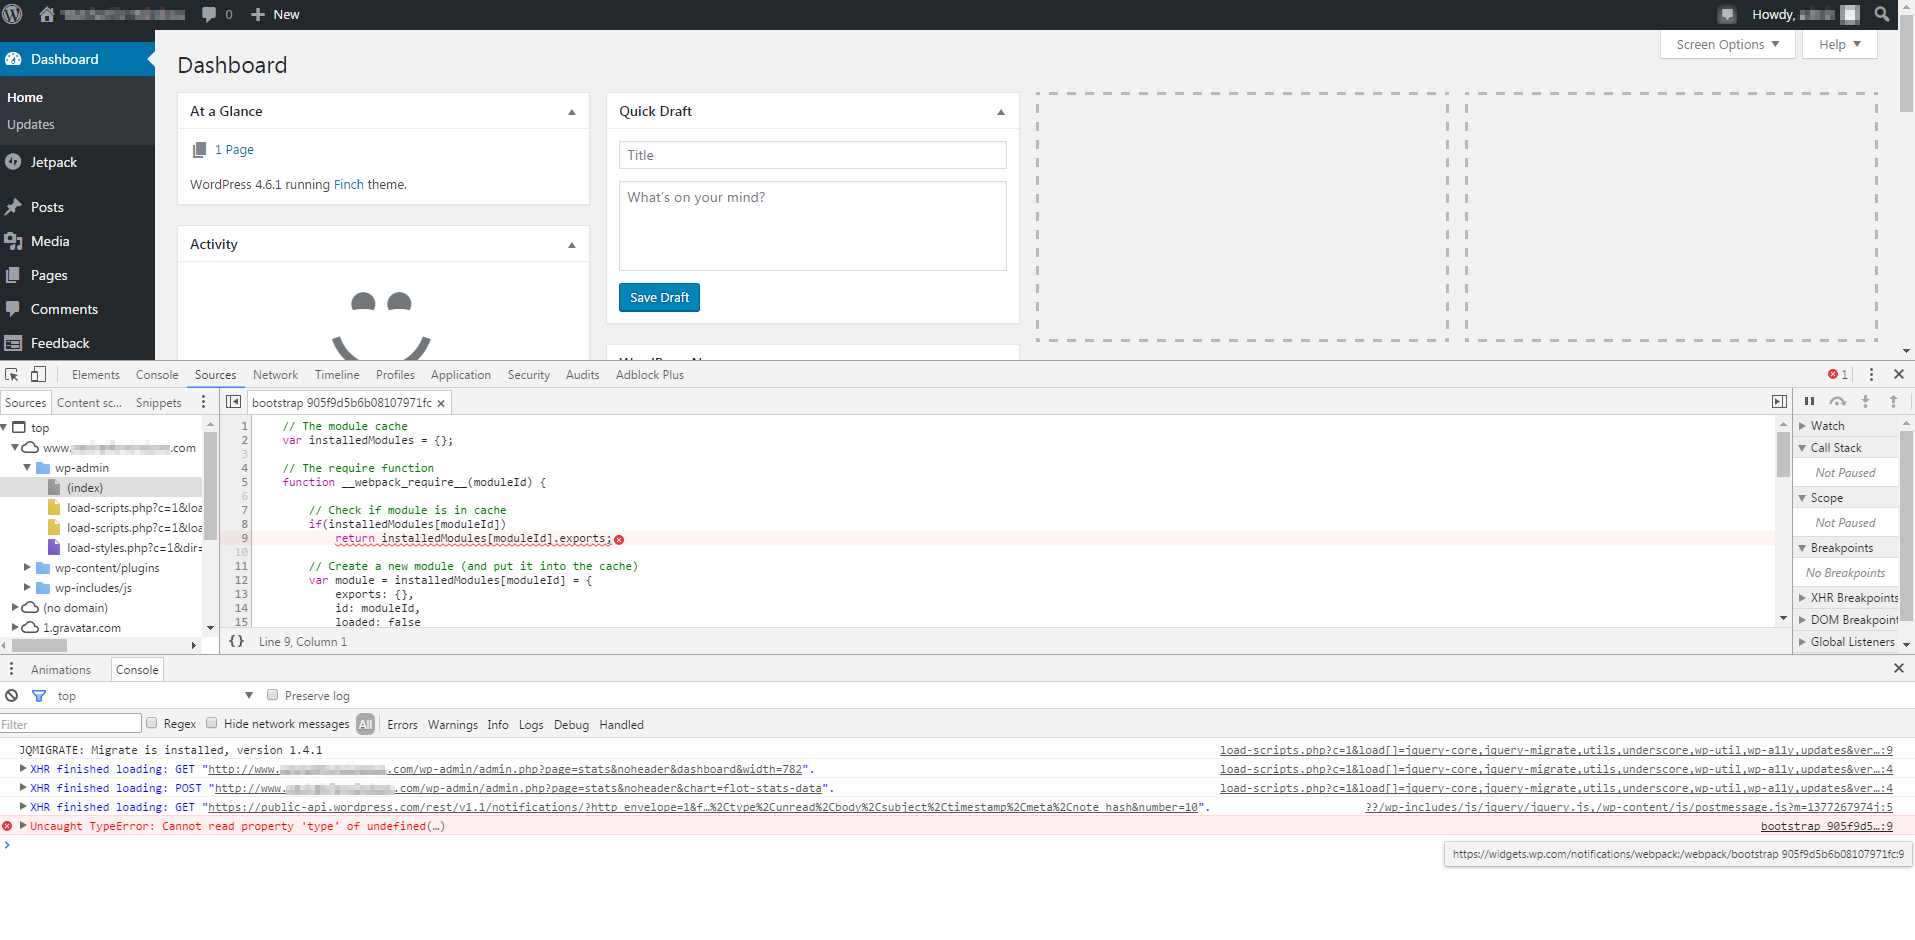
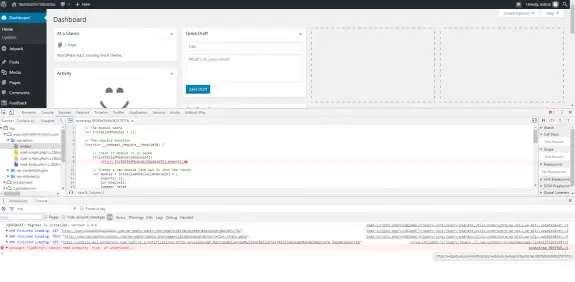
Also I have one more bug that I don’t know how to solve. When I login to these WordPress admins I have this error on every (admin) page I load in my debugger:
Uncaught TypeError: Cannot read property ‘type’ of undefined(…)
This traces back to https://widgets.wp.com/notifications/webpack:/webpack/bootstrap_905f… as you can see in detail on this screenshot:
Update: 05th December 2016
Now Jetpack is works normally on my DigitalOcean droplets, but on some occasions while setting up the Jetpack options I saw this message: Warning! Multibyte support missing!

This means that multi-byte support php module was not installed. To get it installed simply install package php-mbstring using apt-get (or yum in case you’re using CentOS/RHEL Linux), restart Apache and you’re good to go!
sudo apt-get install php-mbstring
sudo service apache2 restart
PHP multibyte should now be installed and these messages should no longer appear.
You made your WordPress blog using DigitalOcean 1-click apps, you have installed Jetpack WordPress plugin but you can’t activate. Instead you’re getting this message:
Error Details: The Jetpack server was unable to communicate with your site [HTTP 500]. Ask your web host if they allow connections from WordPress.com…
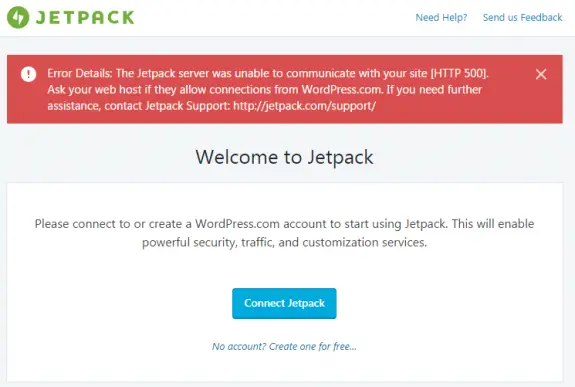
But the problem is not with the communication between WordPress.com and your DigitalOcean droplet. The problem is with the fact that following php modules were not installed: php7.0-xml and php7.0-xmlrpc.
No we can argue why these were not installed by default: it might be due the fact that this way WordPress XML-RPC will not function and this would automatically reduce the amounts of spam on your blog (more likely) or that that the system would perform (slightly) better without these two modules (less likely) but in order for JetPack to work we need to install these two modules and to restart the apache.
Here are the commands you need to execute in console in order for it to work:
sudo apt-get install php7.0-xml php7.0-xmlrpc
sudo service apache2 restart
After you have done this logout out of your WordPress, then login back again and try once again to connect your Jetpack plugin. I hope it will work out for you since it just did it for me on more than 10 different droplets!
Compressing data like html, js, css before transmitting them to the visitors can speed up your sites and save you bandwidth. Recently I have updated Apache on one server from version 2.2 to 2.4 but my mod_deflate rules won’t work any more (because of changes in the new version of Apache).
Here are my old mod_deflate rules I used on Apache 2.2:
<IfModule mod_deflate.c>
<IfModule mod_setenvif.c>
<IfModule mod_headers.c>
SetEnvIfNoCase ^(Accept-EncodXng|X-cept-Encoding|X{15}|~{15}|-{15})$ ^((gzip|deflate)\s*,?\s*)+|[X~-]{4,13}$ HAVE_Accept-Encoding
RequestHeader append Accept-Encoding "gzip,deflate" env=HAVE_Accept-Encoding
</IfModule>
</IfModule>

<IfModule filter_module>
FilterDeclare COMPRESS
FilterProvider COMPRESS DEFLATE resp=Content-Type $text/html
FilterProvider COMPRESS DEFLATE resp=Content-Type $text/css
FilterProvider COMPRESS DEFLATE resp=Content-Type $text/plain
FilterProvider COMPRESS DEFLATE resp=Content-Type $text/xml
FilterProvider COMPRESS DEFLATE resp=Content-Type $text/x-component
FilterProvider COMPRESS DEFLATE resp=Content-Type $application/javascript
FilterProvider COMPRESS DEFLATE resp=Content-Type $application/json
FilterProvider COMPRESS DEFLATE resp=Content-Type $application/xml
FilterProvider COMPRESS DEFLATE resp=Content-Type $application/xhtml+xml
FilterProvider COMPRESS DEFLATE resp=Content-Type $application/rss+xml
FilterProvider COMPRESS DEFLATE resp=Content-Type $application/atom+xml
FilterProvider COMPRESS DEFLATE resp=Content-Type $application/vnd.ms-fontobject
FilterProvider COMPRESS DEFLATE resp=Content-Type $image/svg+xml
FilterProvider COMPRESS DEFLATE resp=Content-Type $application/x-font-ttf
FilterProvider COMPRESS DEFLATE resp=Content-Type $font/opentype
FilterChain COMPRESS
FilterProtocol COMPRESS DEFLATE change=yes;byteranges=no
</IfModule>

<IfModule !mod_filter.c>
# Legacy versions of Apache
AddOutputFilterByType DEFLATE text/html text/plain text/css application/json
AddOutputFilterByType DEFLATE application/javascript
AddOutputFilterByType DEFLATE text/xml application/xml text/x-component
AddOutputFilterByType DEFLATE application/xhtml+xml application/rss+xml application/atom+xml
AddOutputFilterByType DEFLATE image/svg+xml application/vnd.ms-fontobject application/x-font-ttf font/opentype
</IfModule>
</IfModule>
And here’s my new Apache 2.4 code that enables mod_deflate compression:
<IfModule mod_deflate.c>
SetOutputFilter DEFLATE
SetEnvIfNoCase Request_URI \.(?:gif|jpg|png|ico|zip|gz|mp4|flv)$ no-gzip
</IfModule>
Nice and easy! You can add other extensions you do not want to compress to the list above and that should be it!
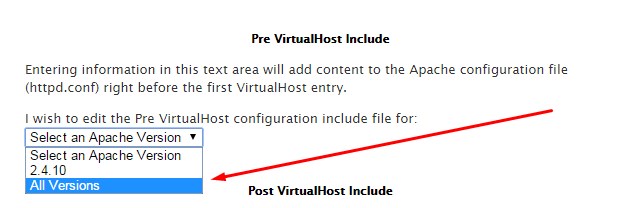
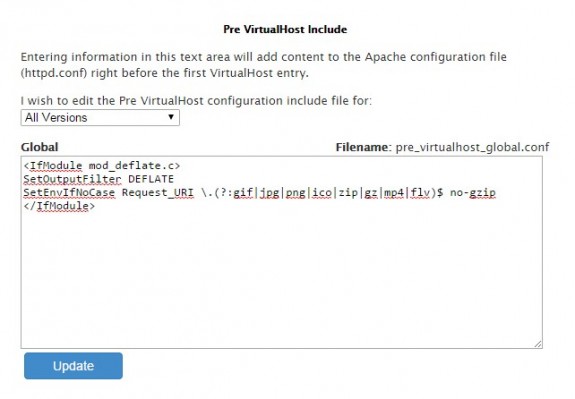
cPanel/WHM users should login to WHM then go to Service Configuration -> Apache Configuration -> Include Editor then locate Pre VirtualHost Include on the page and select All Versions from the list (or current version of the Apache in my case 2.4.10).

Then simply copy paste the code above into the box, save and restart the Apache service.
Note: The process is same for Apache 2.2 just use the appropriate code from above.
Streaming FLV files with Apache + mod_flvx has never been easier. Setup your web server to stream FLV files using Apache in just 3 minutes.
cd /usr/local/src
wget http://people.apache.org/~pquerna/modules/mod_flvx.c
apxs -cia mod_flvx.c
If your system can’t find apxs locate it using
which apxs
You’ll get something like /usr/bin/apxs as result – that’s the path to it – you need it for next step
And then use full path to apxs to compile (for example):
/usr/bin/apxs -cia mod_flvx.c
Non WHM/cPanel users
Should now add those two lines into httpd.conf:
LoadModule flvx_module modules/mod_flvx.so
AddHandler flv-stream .flv
and simply restart Apache using:
service httpd restart
WHM/cPanel users
Should use Include Editor since any changes made to httpd.conf will be lost in case of rebuilding apache.
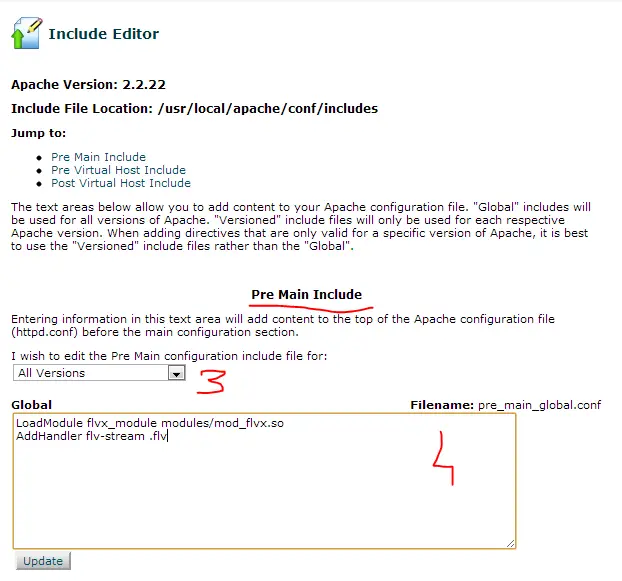
So login to WHM and go to Apache Configuration -> Include Editor -> Pre Main Include -> All Versions and in the box that appears copy/paste following two lines and after saving that confirm Apache restart.
LoadModule flvx_module modules/mod_flvx.so
AddHandler flv-stream .flv
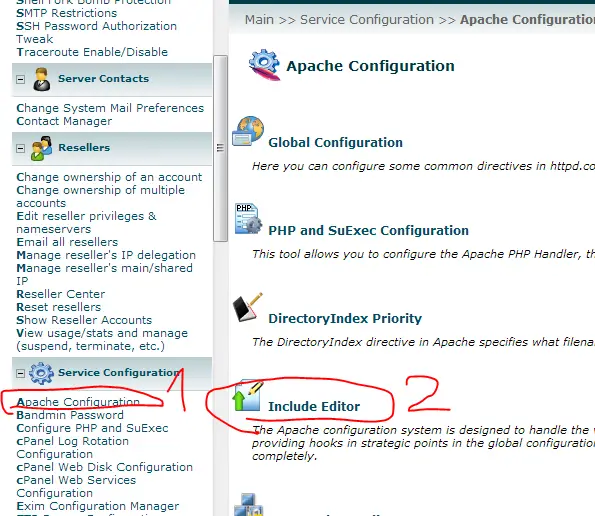
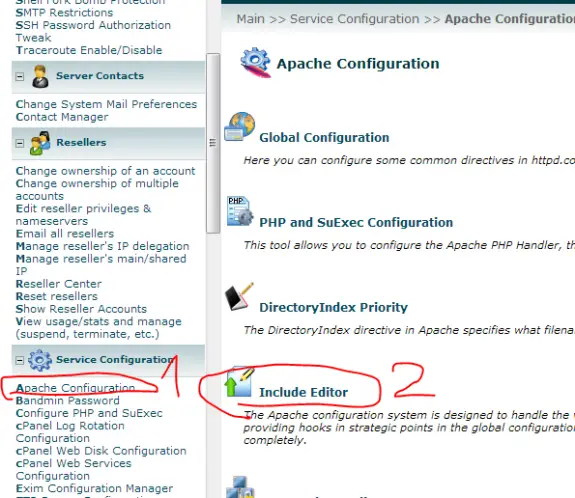
Here are a few pictures for newbies so they can find their way trough more easily:
1. Apache Configuration
2. Include Editor
3. Locate PreMain Include – select All Versions
4. Copy/paste those two lines and press Update (then confirm Apache reload)

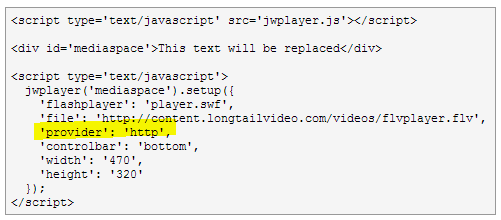
Setting up the player
If you use JW Player (that I strongly recommend) you need to set provider to value http.
Visit JW Player setup wizard to easily install JW Player on your site.
MP4 Streaming using Apache
To learn how to setup MP4 streaming using Apache click here
Tags: apache flv streaming
Recently I discovered problems trying to install anything using yum on new servers based on CentOS 6 (64-bit) + WHM/cPanel. I was trying to install subversion using yum:
yum install subversion
And I was getting following output:
Error: Package: subversion-1.6.11-7.el6.x86_64 (base)
           Requires: perl(URI) >= 1.17
 You could try using --skip-broken to work around the problem
** Found 5 pre-existing rpmdb problem(s), 'yum check' output follows:
bandmin-1.6.1-5.noarch has missing requires of perl(bandmin.conf)
bandmin-1.6.1-5.noarch has missing requires of perl(bmversion.pl)
bandmin-1.6.1-5.noarch has missing requires of perl(services.conf)
exim-4.77-1.x86_64 has missing requires of perl(SafeFile)
frontpage-2002-SR1.2.i386 has missing requires of libexpat.so.0
And I would get that trying to install just about anything with yum or by calling yum check.
To solve this problem you will have to open /etc/yum.conf for editing and to locate perl* in exclude= line and remove it (just perl* part). Now install anything by running the yum install package_name it will solve all those problems that you had! Once the installation is done and problems are solved, don’t forget to put perl* back to /etc/yum.conf in exclude= list!
Tags: frontpage-2002-sr1 2 i386 has missing requires of libexpat so 0, bandmin-1 6 1-5 noarch has missing requires of perl(bandmin conf), ** found 29 pre-existing rpmdb problem(s) \yum check\ output follows: