Problems:
– Have you ever wondered how to setup your own private Cloud service?
– Is there any (preferably self hosted) alternative to DropBox, Google Drive, SkyDrive… ?
– Services like Dropbox and Google Drive are really good but they can cost you money if you need more space.
– You have tried all the alternatives to Dropbox and Google Drive but you need something different?
– Do you really need all the futures they provide?
– Do you need more features (like syncing calendars, tasks, contacts and music)?
– Do you want to be able to install pre-made or develop your own plugins for your cloud?
– Can we really trust companies like Google or Dropbox them with our data?
– Are you a small company or start-up and you can’t afford a $795/year for Dropbox team service?
– You also need iPhone and Android application so you can access your files on your phone?
– You also want a Windows, Mac or Linux Desktop application and Web access?
– You want to host that could on your company server or inhouse? And you want it on a sub-domain like cloud.yourcompany.com?
– And you want it free or really cheap?
Not a problem! We got you covered with all that!!!
The Solution
The solution to problems listed (and un-listed) above is really simple. All you need is to install ownCloud on your server/hosting. This software is a PHP/MySQL powered so it will work on just about any Linux server and is released under AGPL license.
Getting Hosting
In case you have hosting (shared/vps/cloud/dedicated) you can skip this paragraph.
If you don’t have one – you can get it pretty cheap these days and my advice is to go with DigitalOcean. They will provide you with great entry level VPS (512MB of DDR3 RAM, 1 Intel Xeon 2GHz Core, 20GB od SSD hard disk space and 1TB of bandwidth) for just $5. Did I mention it’s SSD powered – so it’s blazing fast! Plus you can deploy your VPS in US or NL and you can add backups for 20% (in this case for $1 extra a month). New VPS is provisioned in 60 seconds and you pay per hour of use (not monthly). So you’re invited to play bit with different linux distributions, geo-locations and sizes etc.. and to fully test it out before you put it in production use.
Detailed installation instructions for Digital Ocean can be found in here and if you need any help in setting it up – feel free to contact me.
Installing OwnCloud on shard hosting
The installation process is easy and it’s similar to installing just about any PHP/MySQL script (like WordPress for eg.).
Here’s step by step guide:
1. Download the web installer from this url: https://download.owncloud.com/download/community/setup-owncloud.php
2. Upload setup-owncloud.php to your web space
3. Point your web browser to setup-owncloud.php on your webspace
4. Follow the instructions and configure ownCloud
5. Login to your newly created ownCloud instance!
In case you need any help with the setup feel free to contact me
Downloading Desktop Client
There are Desktop Sync Applications already developed for Windows, Linux and Mac OS. All you need to do is to download them and install them.
iOS and Android Applications
You can get them from Apple Store or from Google Play. They are not free but are really cheap and cost only $0.99 to install. Here’s a nice YouTube tutorial of Android Application:
Feature list of ownCloud
– Access, Share and Sync your data
– Tasks, Contacts, Calendar, Galleries and Music
– Public API
– Templates
– SSL Encryption
– Powerful Search
– File Versioning
– File Un-Delete
– Download whole folders as ZIP archives
– LDAP Active Directory
– User Management
– User Quotes and Groups
– Internal Messages (free 3rd party app)
– External Storage (access data from AmazonS3, GoogleDocs, DropBox, FTP…)
– PDF viewer in browser (no plugins required)
– ODF Document Viewer (file formats: .odt, .odp, .ods)
– Image Viewer and Media Player (free 3rd party app)
– Text Editor (PHP editor with syntax highlighting)
– Translated into many laguages
– Migration and backup of accounts
– Application store (so you can expand your cloud with extra plugins)
– If you are HUGE company or organisation you should check Enterprise Edition at ownCloud.com
ownCloud Demo
To try out the ownCloud software you can check official ownCloud demo
Conclusion
OwnCloud is really interesting, feature rich cloud platform that enables you to share your data between users and various devices. It can be useful for both individuals and companies/organizations. If you have a need for your own cloud solution or you are looking for alternative to Dropbox, Google Drive or SkyDrive – you should give it a try!
If you have Samsung Galaxy phone and you like to record video clips with it you can run out of storage pretty quick. Also, if you have your Dropbox account connected with your phone it will sync those videos to Dropbox and will top it pretty quick. If you would like to keep some (or all) clips that you made on your phone it would be nice if they could that take a bit less space.
The solution to this problem is to simply compress videos. Following my simple 1-2-3 step tutorial you’ll be able to compress your videos videos quickly to about a third of their original size without any noticeable quality loss.
Step 1
Download Freemake Video Converter and install it. It’s really one easy to use video compression tool that you should have installed on your computer. It stable, fast, works nicely, easy to use and mostly important totally free to use. (During installation process un-check all the offers like PasswordBox and TuneUp Utilities 2014 etc..) and once installed run the Freemake Video Converter.
Step 2
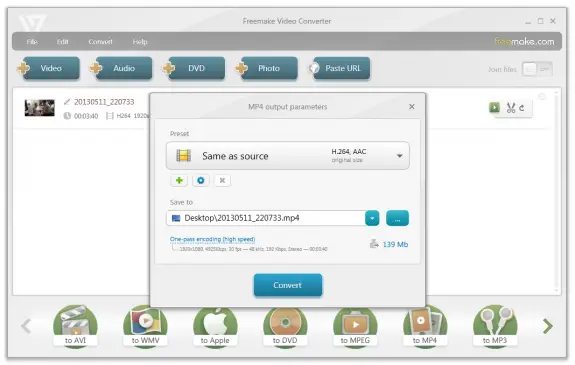
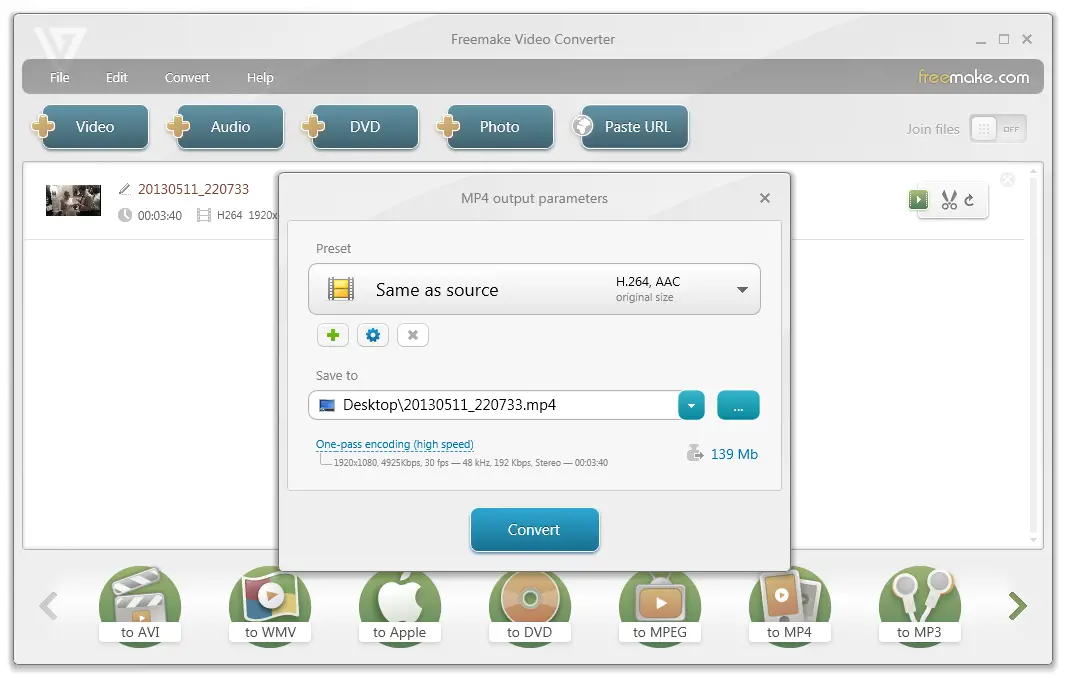
Add videos to Freemake Video Converter (you can drag ‘n’ drop them directly from Dropbox folder). In the bottom menu locate to MP4 button and click it. On the window that will appear you should select Same as source preset. In top right corner you’ll be able to see the size of the output file. In my case input file is 450 Mb (5 minutes long) clip and the output file will be 139 Mb (about 325% smaller than the original file). That’s more than 3 times smaller than original file. If you have time and want maximum quality in the left side bottom of the window you can switch from One-pass encoding (high speed) to Two-pass encoding (low speed). This option will do two pass encoding that will produce slightly better quality but it will take twice more time to complete (on my Intel i5-3570K one pass encoding of that sample 5minute file takes about 2 minutes while wile two pass encoding needs about 6 and a half minutes). The two-pass encoding will not produce the smaller file than the one-pass – output files will be about the same – but it should just produce a (slightly) better quality video. Take a look at screenshot below to get a better look about what I wrote in this step.
Step 3
Now that video compression is finished and you got new (3 times smaller) files – you can replace original (big) files with those we just created. You can drag ‘n’ drop those new files back to Dropbox folder and overwrite the originals. If you want to do the same with your phone you’ll need to connect it to your computer using a USB cable (and some phones might require you to use Samsung Kies software so you can copy the files to and from the phone).
Conclusion
With just a little time and verry little effort you could save lots of space on your phone and Dropbox account by compressing your videos.
Tips
– On some older computers (especially on single core CPUs) video compression could be very resource intensive so you won’t be able to use your computer normally while video compression is processing. My advice is to do that when you’re away from computer (at work, at night). When compression starts you can check Shut down PC after processing is completed and that will turn off your computer once it’s done.
– If you do compression overnight – you can enable two pass encoding.
– If you are compressing some clips of that are valuable to you and you want to keep them for life – enable two pass encoding.
– I think that this will also work with other Android devices but I haven’t got one to try it out. Feel free to experiment and let me know your findings by posting comments.
Note
– I have noticed that the latest version of Free Make Video Converted 4.0.4.4 adds 2 seconds advertisement at the end of the clip ONLY to clips longer that 5 minutes. It’s just their logo fading in on a black background. It’s not a watermark! It’s some kind of their advertisement that I find annoying. So to overcome that I have noticed that older version Free Make Video Converted 4.0.3.0 just adds 2 seconds of black fade out (no logo) and that’s acceptable to me so if that bothers you maybe you should try that older version or experiment with other older versions that you can download from my favorite download site FileHorse.com
Hope that this guide will help you! I’m preparing to write one more on how to easily compress Images as well. Stay tuned.
Enjoy more free space on your Samsung Galaxy and/or your Dropbox account.
I have just got my Samsung Galaxy S4 and I have noticed that it has imported all of the pictures and albums from Goole Picasa to my gallery. I find that very anoying and I was looking for a way how to stop it from doing it so. Here’s how to solve it.
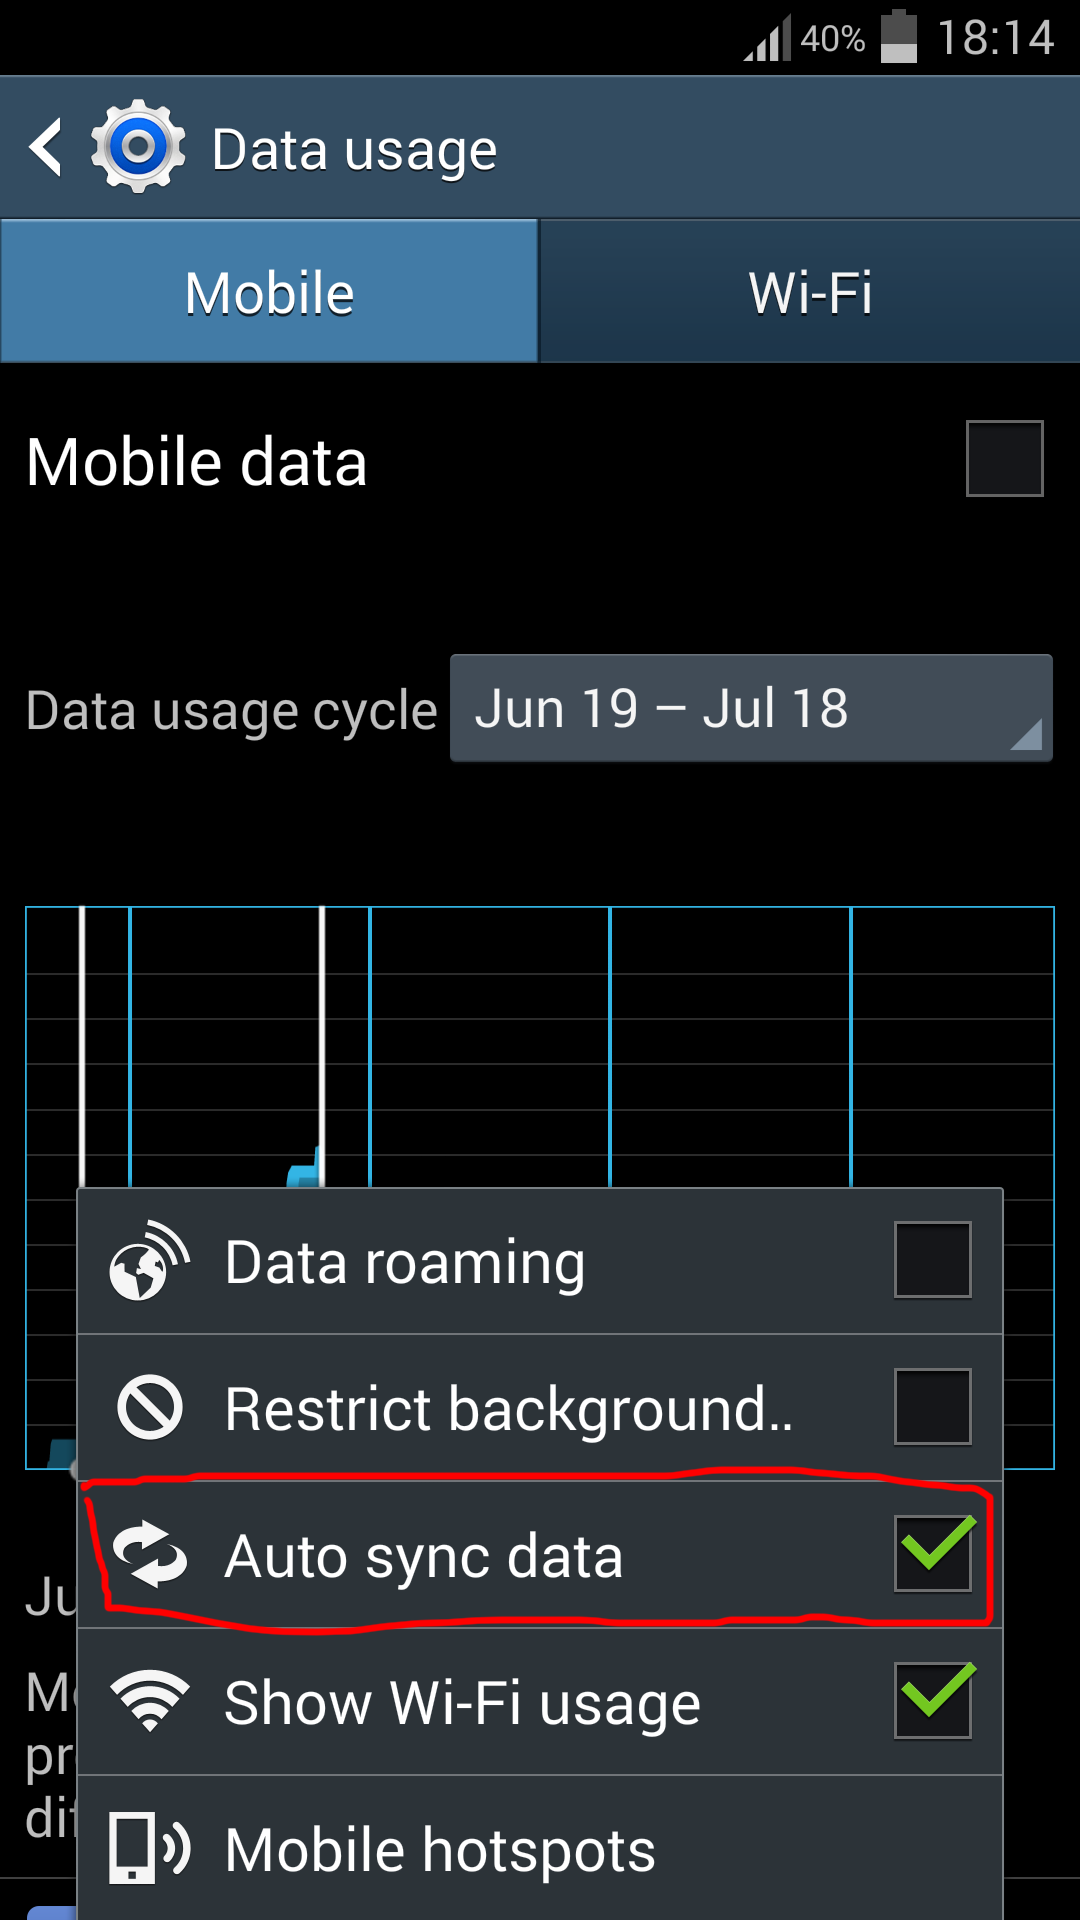
First check if auto data sync is enabled:
1. Go to Settings and at Connections tab select Data Usage
2. In properties enable Auto sync Data (To get the properties click on the button on the left side from your Home button on your phone at the bottom right side)
After that’s done let’s disable the Picasa
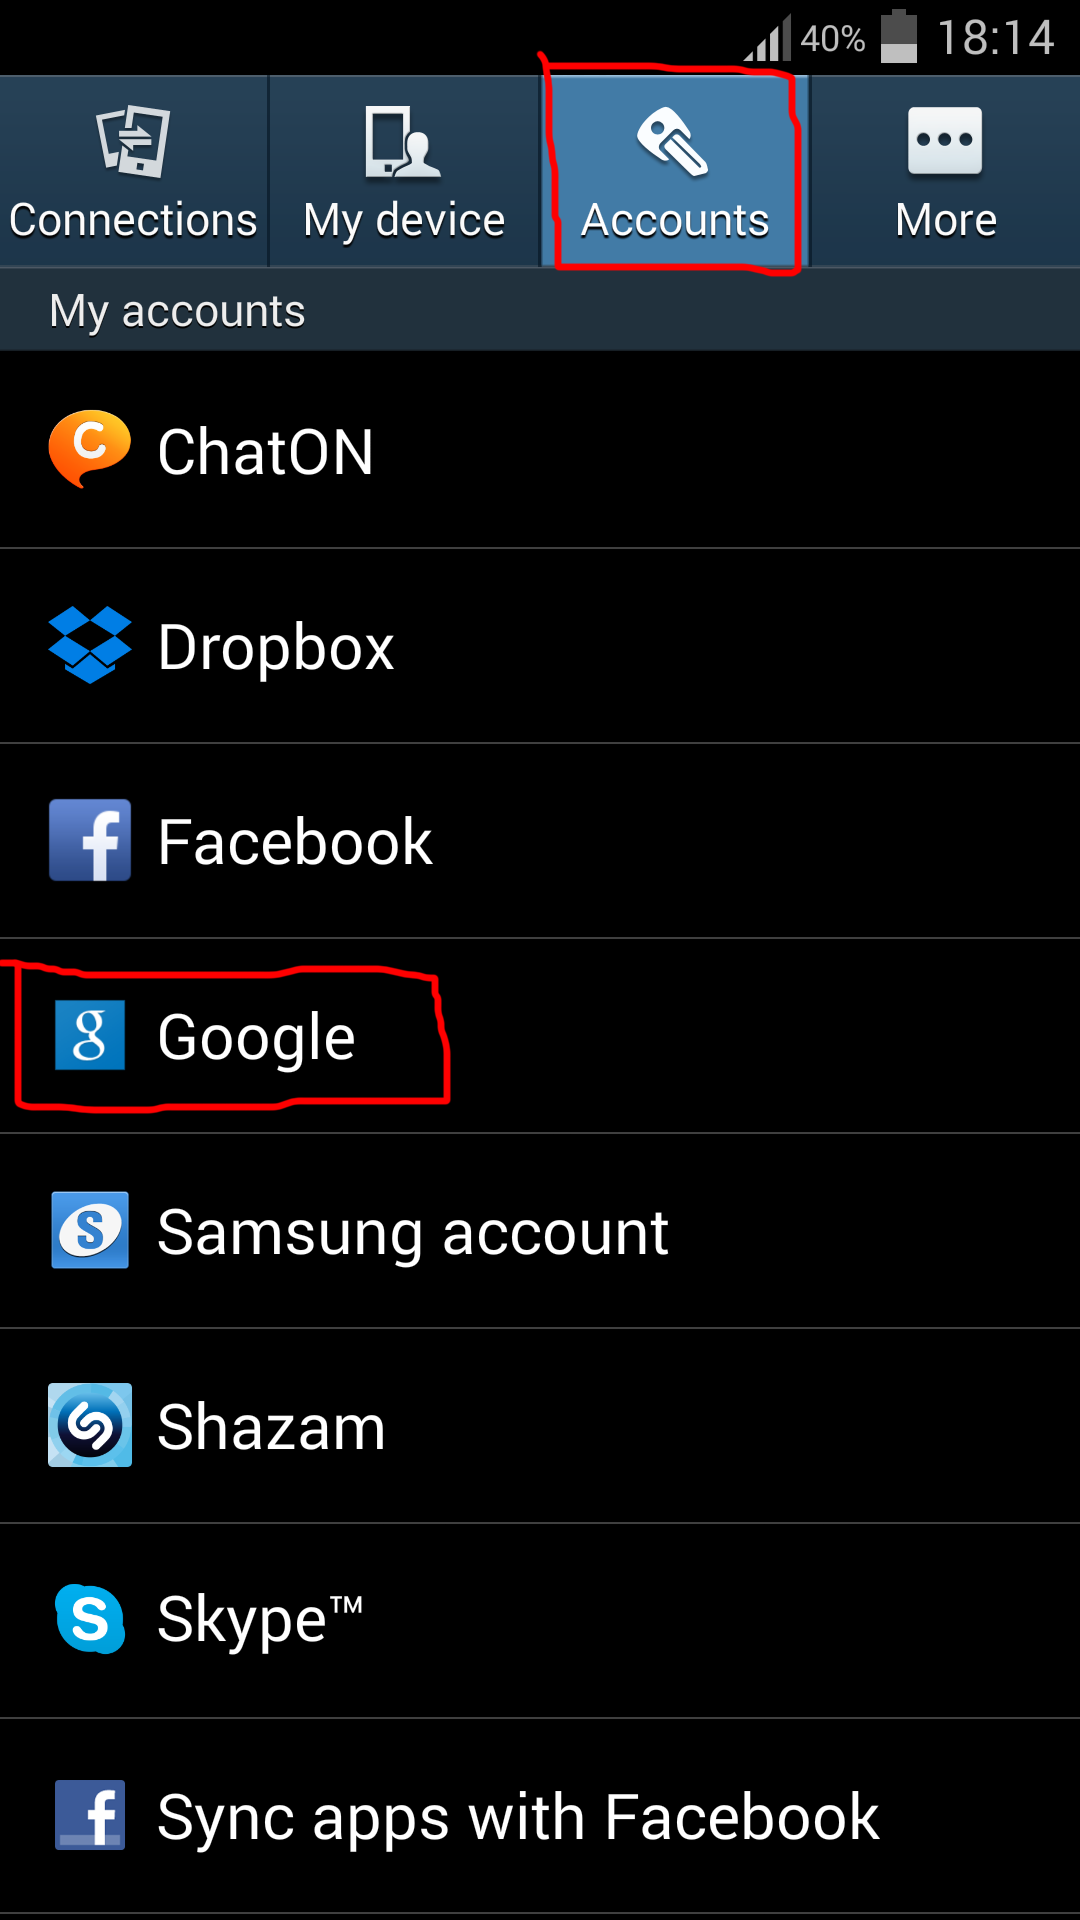
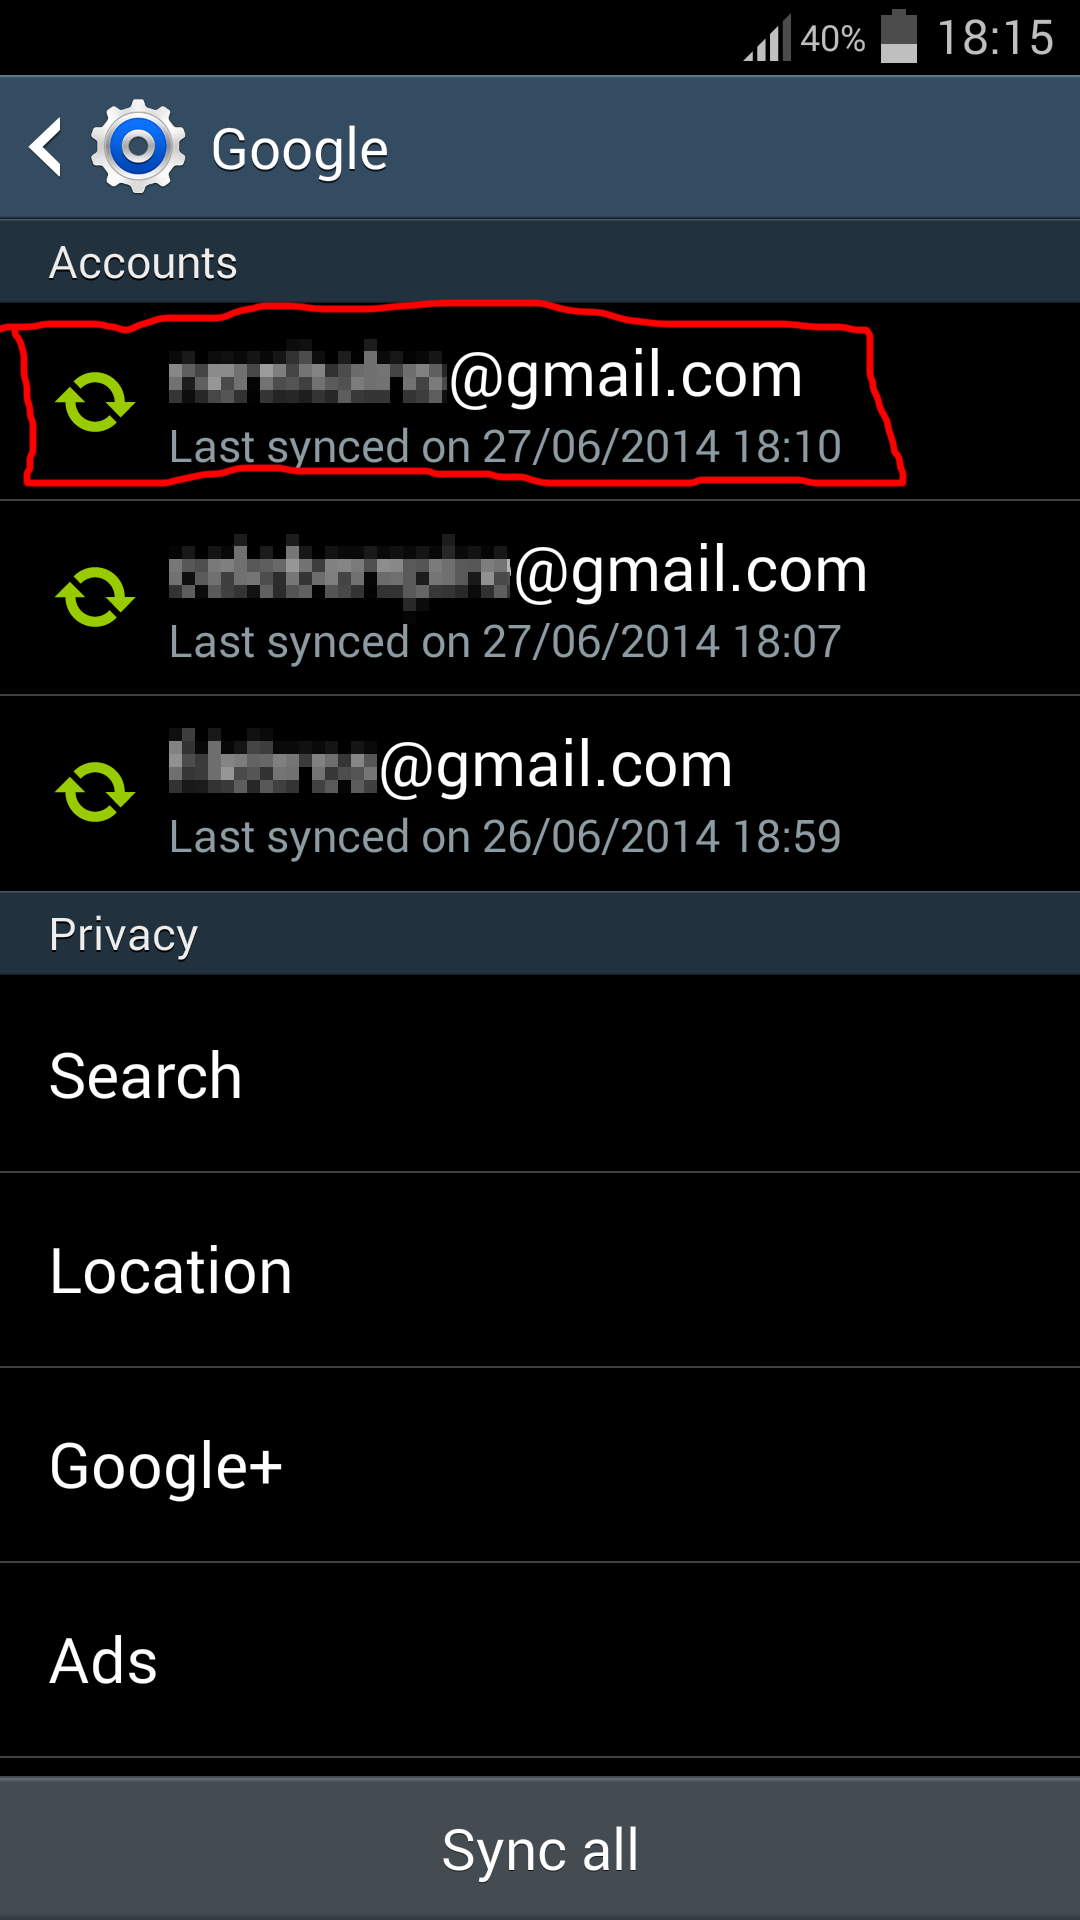
1. Go to Settings and at Accounts tab select Google and then select your Gmail account (most of you have only one, I have three and if you have more than one repeat the following step for every account)
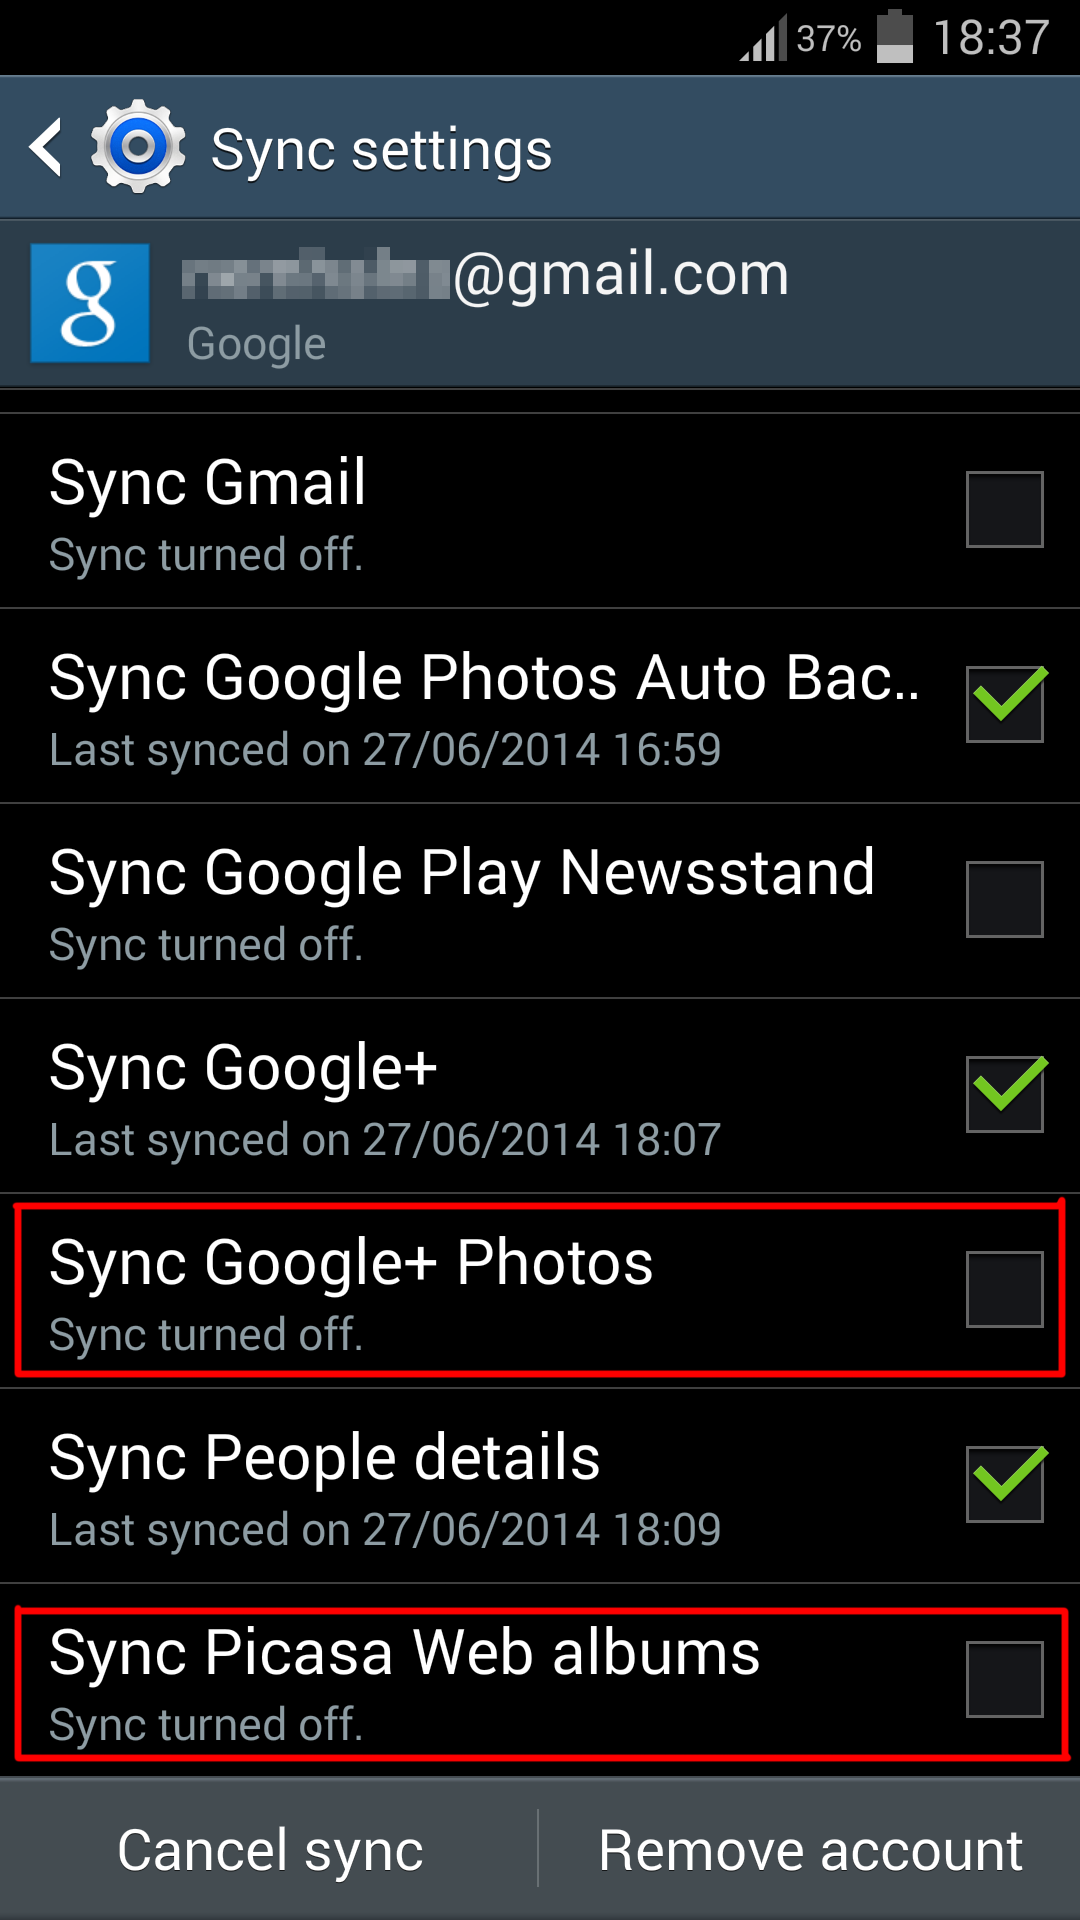
2. On the next page disable Sync Picasa Web albums (and you can also disable Sync Google+ Photos)
That will prevent future pictures from being downloaded from Picasa to your phone, now let’s clear the current ones:
0. NOTE: If you have the phone running on latest Android (Marshmallow) please scroll down since this changed a bit so following three steps are slightly different now.
1. Go to Settings and at More tab enter Application Manager
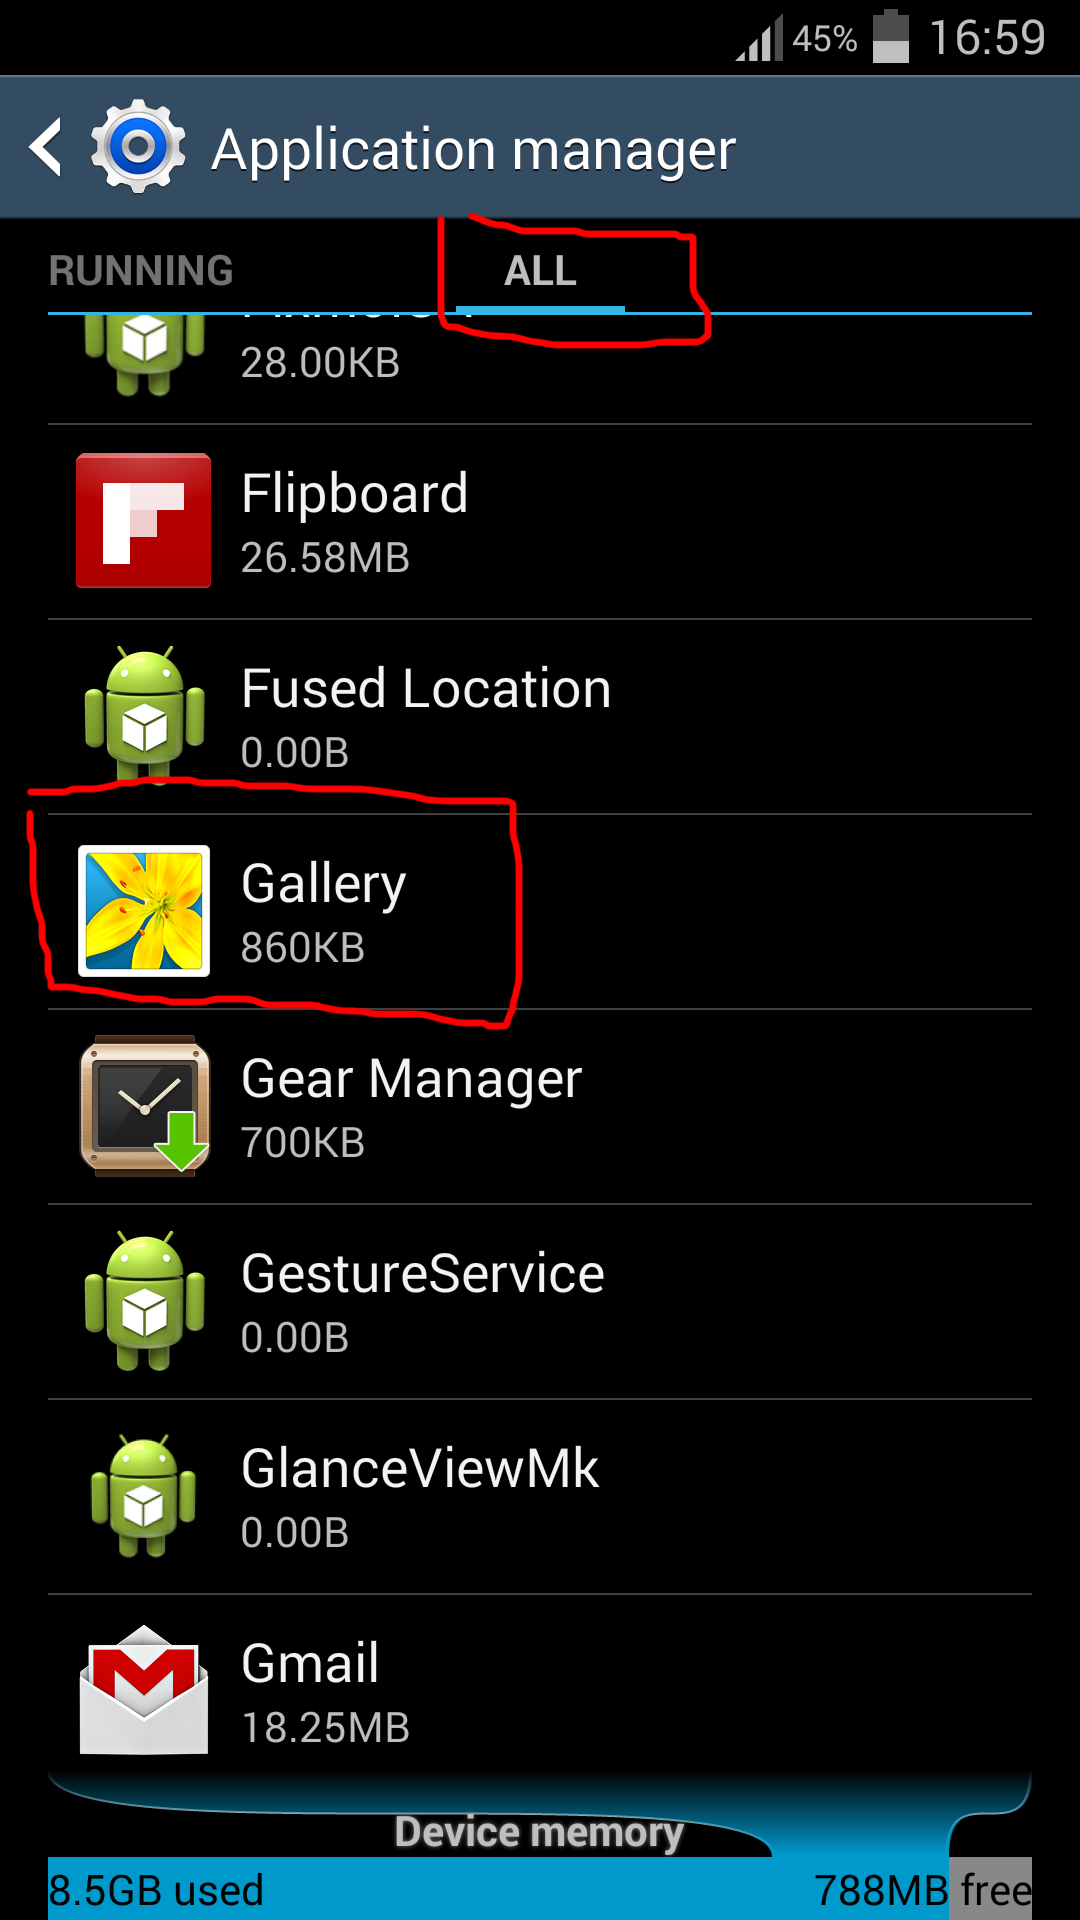
2. Once you’re into Application Manager at the top go trough the tabs above until you reach move the tab All
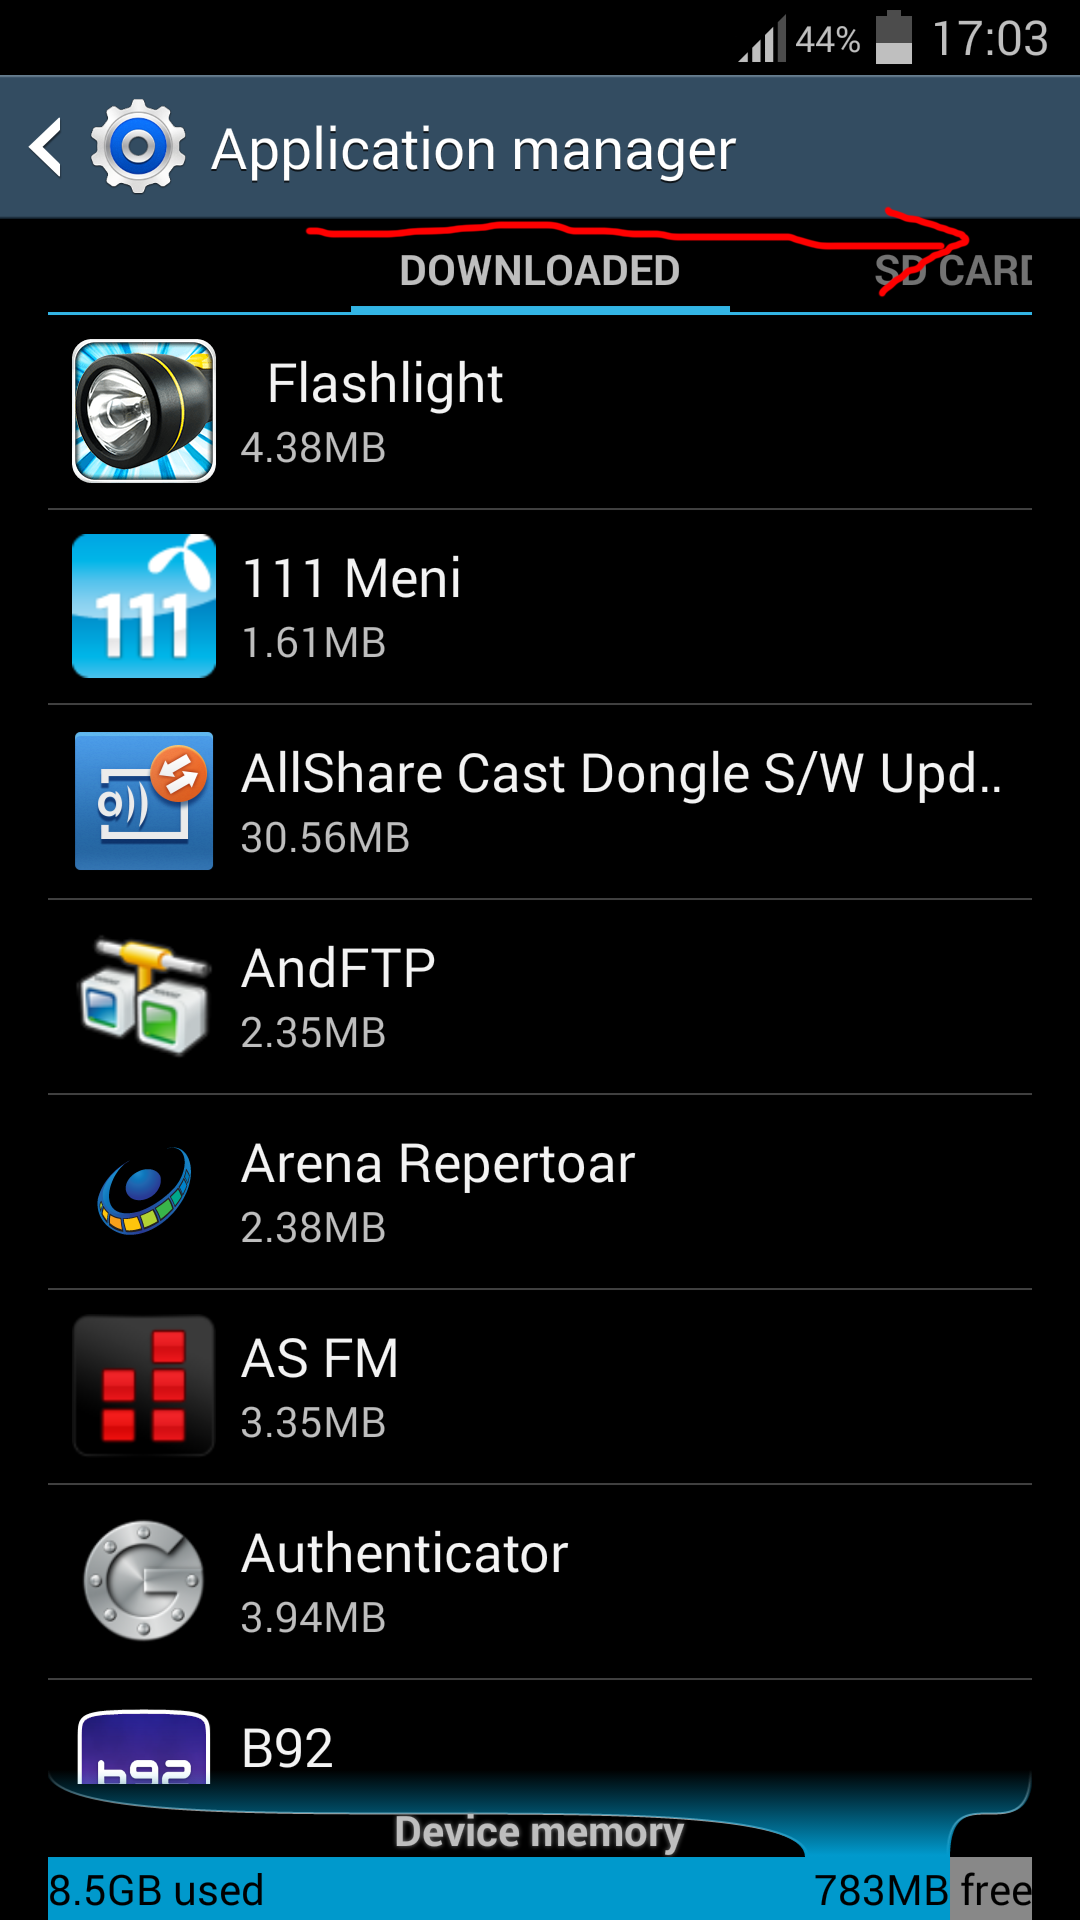
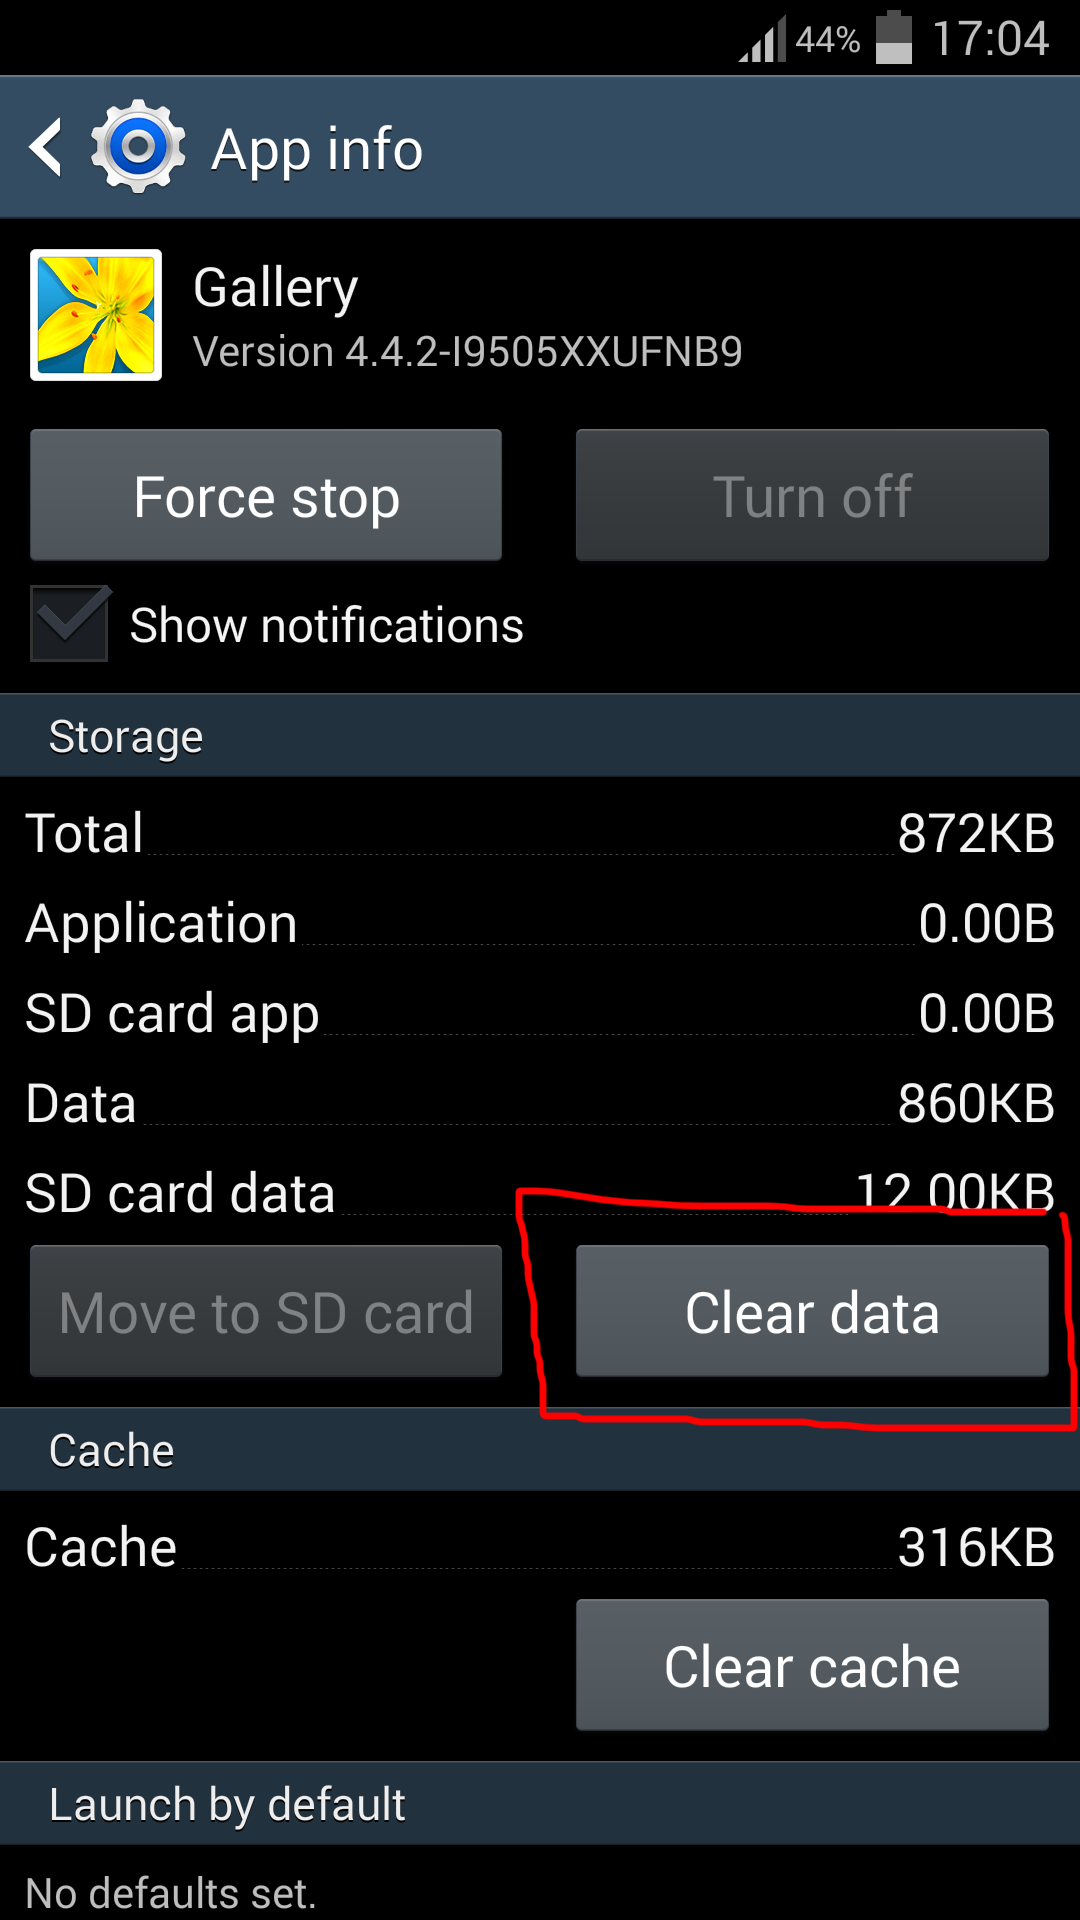
3. Then and find Gallery application, click on it and then click on Clear Data button and confirm.
Now you will no longer have Picasa pictures in your Gallery on your Samsung Galaxy S4 (SGS4) phone. This guide also works on Samsung Galaxy S3 and Samsung Galaxy S5 and probably on some other Galaxy phones. If you have just bought a new Galaxy phone check out some cool accessories, chargers and cases for your phone:
26th July 2014 Update: Added a blog post on how to remove Facebook Albums from Gallery app on Samsung Galaxy S3 or S4.
27th June 2014 Update: I have added screenshots made with my phone to help you out disable Picasa on your Galaxy Phone even easier. If you phone is in other language switch it to English, then disable Picasa as descibed above in the post and then switch the language back to your preferred language. This will minimize chance of making an error.
29th September 2016 Update: Users of newer devices running on latest Android (Marshmallow) should use this guide:
Tags: how to delete picasa photos from samsung galaxy s4, how to remove picasa albums from galaxy s4, how to delete picasa photos from samsung galaxy s3, how to remove picasa albums from galaxy s3, how to delete picasa pictures from galaxy s5, remove picasa from galaxy s4, how to delete photos from picasa on galaxy s4, how to delete picasa pictures from samsung galaxy s3, how to get rid of picasa on s4, how to remove picasa album from galaxy s4, delete picasa photos from galaxy s4, how to delete picasa pictures from galaxy s4, how to delete picasa photos from samsung galaxy s5, how to remove picasa photos from galaxy s4, how to delete picasa photos from galaxy s4, how to remove picasa album from galaxy s3, how to disable picasa on s4, how to remove picasa album from gallery, how to delete photos from samsung galaxy s4, how to delete picasa album from galaxy s3, how to delete pictures from picasa on samsung galaxy s4, how to remove picasa from s4, how to delete picasa photos, how to delete picasa pictures from samsung galaxy s4, how to delete picasa album on galaxy s4, deleting picasa photos from the gallery, how to delete photos from galaxy s4, delete picasa album from galaxy s4, how to delete photos from picasa, how to delete picasa albums from galaxy s4, how do i delete picasa pictures from my galaxy s4, how to delete pictures from picasa, picasa samsung galaxy s4, how to delete picasa albums on galaxy s3, how to remove picasa from galaxy s4
If you own Samsung Galaxy S3 and you would like to speed up of your phone here are a few simple tricks that will make your S3 faster.
Tweak Animation Speed
- Open the Settings menu on your Galaxy S3.
- Browse to Developer Options and change the values of both Window Animation Scale and Transition Animation Scale to 0.5x or even better to 0.
That’s it! Your Galaxy S3 animations should now run remarkably faster and punchier than ever before. (This will also work on Samsung Galaxy S2).
Turn off S-Voice Feature
S-Voice is a feature that automatically receives phone calls, sets an alarm, and dials calls for you using your voice commands. Though this feature is enabled by default, it can be turned off to reduce memory and processor usage on your handset. Here are the steps to disable the feature:
- Open S-voice app.
- Go to S-voice settings.
- Click Turn Off S-voice “Open via the home key“
Slow Gallery
Browsing pictures and opening Gallery can take some time (on phone with lots of pictures and clips even 5-10 seconds since it has to go trough all of them). To speed that up you can install application called QuickPic and if you can adapt to use this application instead of built in gallery you’ll find it much more faster and easier to use. (This app could be also installed on Samsung Galaxy S2).
Tags: galaxy s3 turn off animations
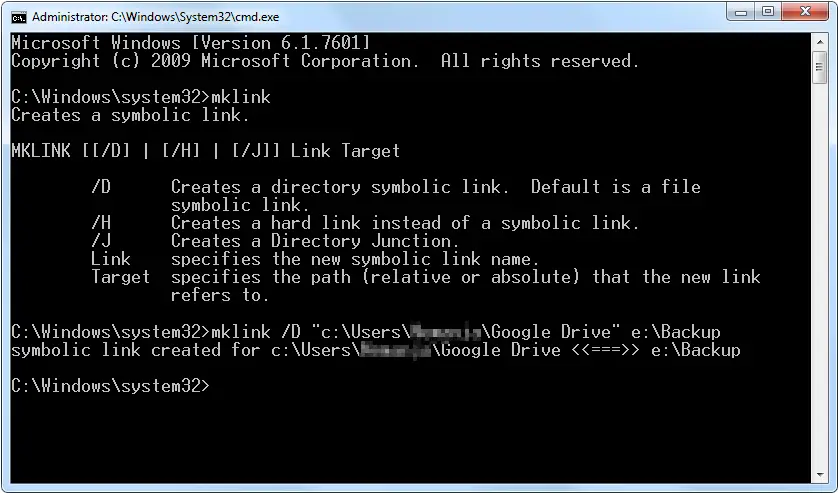
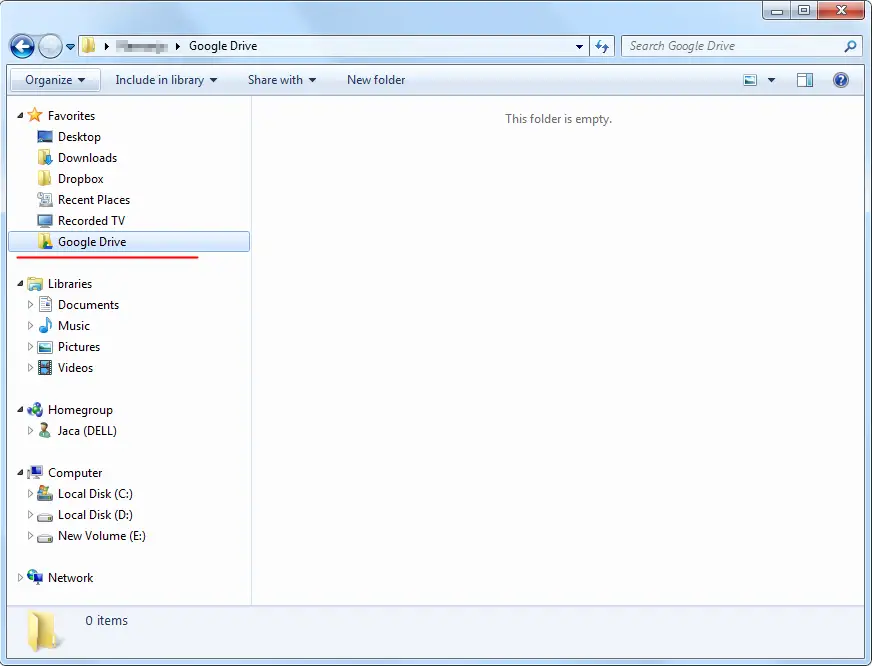
If you’re using Google Drive it’s default path is c:\User\USER_NAME\Google Drive\ but often my partition on c: is quite small since I only use it for operating system and I store all my data on other drives. So I’d like Google Drive to backup my data on other drive and still allow me to access it in my user’s folder. The idea is to create a symbolic link so that C:\User\USER_NAME\Google Drive\ links to e:\Backup in my case (or some other path in your case).
First close (quit) the Google Drive application.
1. Now you need to go and remove directory and all it’s files from C:\User\USER_NAME\Google Drive\ (or simply rename the folder or copy all files to your 2nd backup folder on other drive).
2. Than you need to run CMD as Administrator – see the picture below how:

3. Then you need to make Smbolic link. But not a shortcut link than directory redirect link, entering mklink /D “c:\Users\USER_NAME\Google Drive” e:\Backup
If your backup path contains spaces put it in double quotes too like the fist path.
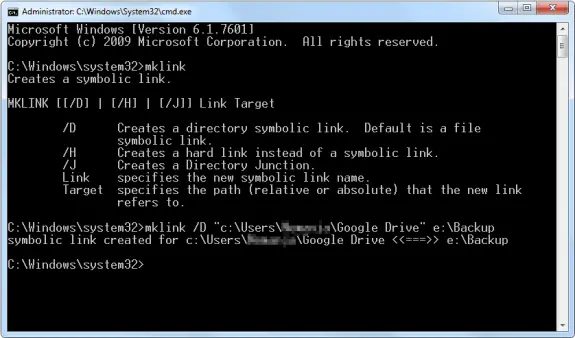
Start the Google Drive and Snyc your data.
That’s it!