After 10 years of running my main desktop computer on Windows 7 – time has finally come to upgrade it to Windows 10. Along with some hardware upgrades that my computer needed, I also wanted to move to the Windows 10 since the support and updates for Windows 7 will be discontinued on January 14th 2020.
Also, my 10 year old Windows 7 PC had a lot of settings and pieces of data that I didn’t want to give up that easily, so I got an idea to make a copy of the current Windows 7 as a virtual machine, so in case I need anything I could just boot the virtual machine and within seconds go back to my Windows 7 setup with all access all data and settings.
Making the virtual machine out of my Windows 7 PC
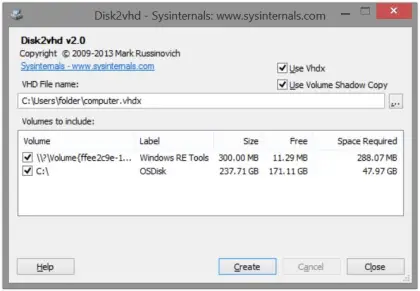
First step was to make a bootable copy of my computer’s hard drive partitions. For this purpose I used Disk2vhd tool made by Microsoft. It’s a free tool and all I needed to do is just pick partitions I want to backup and tell it where to back that up.
Disk2vhd
Ideally, you would want back this up on another drive (so the backup process is quicker since one drive just reads, while other one is just writing). My C: partition was 250gb and it was roughly 45% full and the result was a Windows7.vhdx file of roughly 100 GB in size. That was copy of my Windows 7 PC installation in one big file.
I installed VestaCP for a clien on a new dedicated server running CentOS 7. Once you get a server or VPS with CentOS 7 by default it has no PHP installed.
After you install VestaCP using their guide for some reason you’ll end up with PHP 7.4.0RC5.
$ php -v
PHP 7.4.0RC5 (cli) (built: Oct 29 2019 08:49:19) ( NTS )
Copyright (c) The PHP Group
Zend Engine v3.4.0-dev, Copyright (c) Zend Technologies
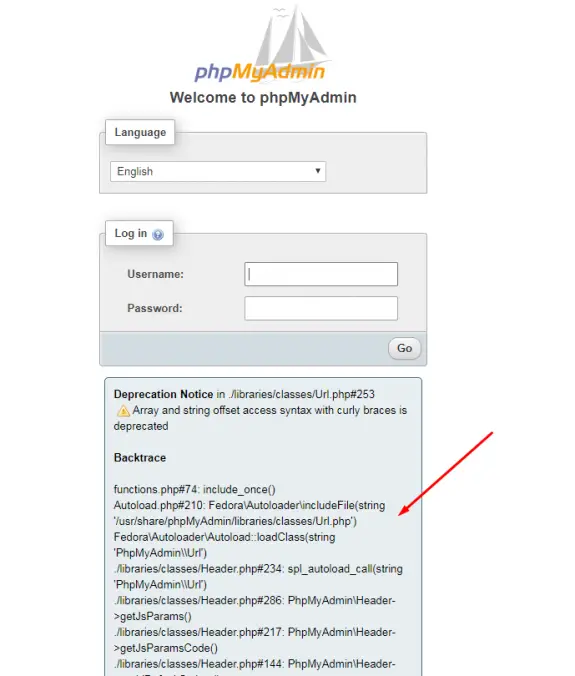
I didn’t like that first time I saw it and after I tried using it like that but the errors would just start popping all over the place. Even with software that VestaCP installed, like phpMyadmin:
phpMyAdmin errors running on VestaCP with PHP 7.4
There were also some errors with some WordPress themes and plugins and it was just not looking right and I wanted to back to stable version of PHP 7.3 but VestaCP doesn’t offer such thing out of the box, so the only way was to remove PHP 7.4 and install PHP 7.3 manually from command line.
After this the you sould have PHP 7.3 up and running:
$ php -v
PHP 7.3.11 (cli) (built: Oct 22 2019 08:11:04) ( NTS )
Copyright (c) 1997-2018 The PHP Group
Zend Engine v3.3.11, Copyright (c) 1998-2018 Zend Technologies
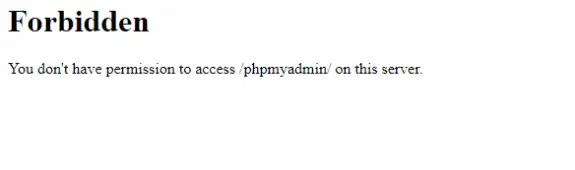
But two other problems arise: phpMyAdmina and RoundCube wembail are not working:
phpMyAdmin not working on VestaCP
I went to check the config files at /etc/httpd/conf.d/ folder and I have noticed duplicate files for phpMyadmin and RoundCube: beside standard .conf files there were also .conf.rpmsave files (old ones).
So I removed these new ones (.conf) and renamed these old ones back to new ones restarted web server and everything was working again. Please make sure that you know what you’re doing here. Instead of deleting these two files you might want to just rename them or move them somewhere in case you’ll need them later. So have that in mind!
So, this is what I have done:
cd /etc/httpd/conf.d/
rm phpMyAdmin.conf
rm roundcubemail.conf
mv phpMyAdmin.conf.rpmsave phpMyAdmin.conf
mv roundcubemail.conf.rpmsave roundcubemail.conf
service httpd restart
BONUS: How to install OPCache and improve your php performance on VestaCP
OPcache improves PHP performance by storing precompiled script bytecode in shared memory, thereby removing the need for PHP to load and parse scripts on each request.
yum install php-opcache -y
service httpd restart
And now php -v confirms that OPCache is active and running:
$ php -v
PHP 7.3.11 (cli) (built: Oct 22 2019 08:11:04) ( NTS )
Copyright (c) 1997-2018 The PHP Group
Zend Engine v3.3.11, Copyright (c) 1998-2018 Zend Technologies
    with Zend OPcache v7.3.11, Copyright (c) 1999-2018, by Zend Technologies
I use Sublime Text on both Windows and Mac and I love it. Recently I discovered that for some reason multi line editing wont work. This is very handy feature that allows you to edit more than one line at the same time and I use it quite often.
The easiest way to enter multi-line editing mode, is by pressing Control + Shift + L simultaneously, but for some reason it wont work anymore.
Apparently, the problem is caused after I upgraded my AMD Drivers and I got that Radeon thing sitting in my task-bar (that I didn’t had before or I have disabled it previously). This tool uses exactly the same hot-key combo as Sublime and it prevents sublime from functioning.
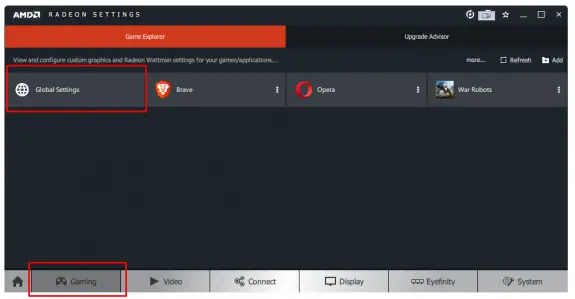
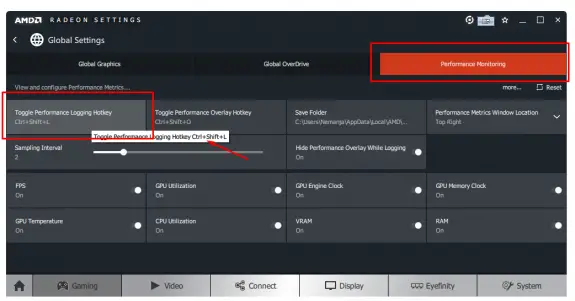
Here’s how you can fix this. First start AMD Radeon utility, click on Gaming tab and then click on Global Settings.
Next click on Performance Monitoring tab and there you have it, the first item on the list called Toggle Performance Logging Hotkey is using the hotkey CTRL+Shift+L hotkey. Click on it to change it and press Delete key to remove hotkey for that function, and the value will change from Ctrl+Shift+L to None.
At this point your Sublime multi-line editing tool is working again and you may close this AMD Radeon thing.
Last year Microsoft bought GitHub for $7.5B and shortly after that they have changed their policy on private repositories. Before, private repositories were reserved only for paying members, but since January 7th 2019 even non-paying users are allowed to have unlimited private repositories.
In case you want to migrate your private repository from BitBucket to GitHub and keep all the previous gits.
First, login to your GitHub and make a new empty private repository (do not tick “Initialize this repository with a README”). You can use any name but the best practice is to use the same name as on BitBucket.
Now let’s clone the repository from BitBucket and push it back to GitHub. Make sure to replace geektnt with your bitbucket/github username and coolproject with an actual repository name.
At this point you can remove old BitBucket repository if everything works at GitHub.
This way to migrate worked out amazing for me and I have moved couple of my older private projects from BitBucket to GitHub so I can have them all at one place.
Since iOS 11 your images that you shoot with your iPhone can now be saved in two formats:
High Efficiency (the new HEIC format)
Most Compatible (standard JPEG format)
If you go to Settings -> Camera -> Formats you’ll see these two options. On all iPhone 7 or newer devices High Efficiency format is enabled by default.
New High Efficiency (HEIC) format
Most people are familiar with JPEG format since it’s been around for ages. But what’s that new High Efficiency (HEIC) format all about?