Today I wanted to install Git on a server with cPanel/WHM and have got the following result:
yum install git
Resolving Dependencies
--> Running transaction check
---> Package git.x86_64 0:1.7.1-4.el6_7.1 will be installed
--> Processing Dependency: perl-Git = 1.7.1-4.el6_7.1 for package: git-1.7.1-4.el6_7.1.x86_64
--> Processing Dependency: perl(Git) for package: git-1.7.1-4.el6_7.1.x86_64
--> Processing Dependency: perl(Error) for package: git-1.7.1-4.el6_7.1.x86_64
--> Finished Dependency Resolution
Error: Package: git-1.7.1-4.el6_7.1.x86_64 (base)
           Requires: perl-Git = 1.7.1-4.el6_7.1
Error: Package: git-1.7.1-4.el6_7.1.x86_64 (base)
           Requires: perl(Git)
Error: Package: git-1.7.1-4.el6_7.1.x86_64 (base)
           Requires: perl(Error)
 You could try using --skip-broken to work around the problem
 You could try running: rpm -Va --nofiles --nodigest
Then I did some research and have found out that Gis is already installed on cPanel as of version 11.36 but the problem is – it’s installed on this path:
/usr/local/cpanel/3rdparty/bin/git
So for ease of use I advise you to make a simple symlink:
ln -s /usr/local/cpanel/3rdparty/bin/git /usr/bin/git
so you don’t have to remember the path above and you can simply use it like you got used.
Note: In order for user to be able to login to SSH, it must be allowed in WHM first at Account Functions > Manage Shell Access and there just switch from Disabled Shell to Jailed Shell.
Happy Gitting!
If your /boot partition is running out of disk space this is probably because you got bunch of old Linux kernels that got stockpiled there and are no longer in use or needed for system to function normally. If you’re running a WHM/cPanel you’ll get an email with subject: DISKWARN blocks: Mount Point “/boot”
Usually on a system update, if there is a new Linux Kernel it will get downloaded and initialized while the last one will be kept for just in case the first one fails for any reason. In couple of months or years you could already have 5-6 of them while only the latest Linux kernel would be in use and the previous one will be kept as a backup. Removing these by hand is possible but an mistake could end up with a system that won’t boot.
To prevent that and free up disk space at /boot partition on Red Hat Linux or CentOS Linux all you need to do is simply to execute this command:
sudo yum install yum-utils && sudo package-cleanup --oldkernels --count=2
This will remove all your old kernels keeping just the last two (latest one and the previous one just in case) so you won’t get these emails or notifications anymore and you’ll keep your /boot partition with enough free space for a new kernel to be installed once released.
Logging in to your DigitalOcean droplets is more secure if you use SSH keys compared to using root password. Today, I had to add my key to existing droplet (running over 3 years now) and to a droplet I have just created and setup everything on it but forgot to add a SSH Key to it. And just for the record I’m using Windows computer at the moment and the key is generated by PuttyGen. You should already have your SSH key pair: private and public SSH key before you proceed with this guide. I know that doing the same thing on Mac (or Linux) is much easier and all you would have to do is just execute one line of code in Terminal, but again I’m currently using Windows and this tutorial is intended for Windows users. Also note that this same guide will also work in case you have a dedicated server or a VPS at any other provider.
So, how do you add a SSH key after creating a droplet? I went to numerous replays on DO community but haven’t found the correct answer. To make this work first you need to open your favorite text editor: Notepad++, Sublime, Atom any of these editors is just fine (as long you don’t use MS Word). Now copy/paste your public key text in it.
So here is how a Public Key looks like:
---- BEGIN SSH2 PUBLIC KEY ----
Comment: "rsa-key-20161012
AAAAB3NzaC1yc2EAAAABJQAAAQEAkBUbfyu0amE+uld7dk9LJnJytmVf8qx4TBvT
0jCYKfNKJj2io8Jh3gB5Lyqhk2xMmPfthn2d/uRbIESmxN3DNE8NbD5Wubr0Q15i
ihAkn0qpxV8HodTONiwGP5GhFJqEe0ThHVa8w13oah/UYqH/a40/N/LaOaTcMaC/
V6hGQhCE+mCz5tmVsQm2CarNdWZffIYhHLDiSgd4DY609UKnA5LQAV1/cHK1FYVE
qiKISpoNZBJ8a0ZOn/a98fVqv7BnxHwvszDJ7Kwusx3ejJVDN2EykfT+SMXSjehX
Ly7ytRW8a7xSHwxa8yR+7lAcdgyrQryWUfBvDce1hdpk1M4sOQ==
---- END SSH2 PUBLIC KEY ----
Please note that this is not my actual public key and I have generated this one just for the purpose of creating this post. So it’s useless and don’t use it for anything.
Now you need to get rid of first two lines (—- BEGIN SSH2… and Comment …) and the last line (—- END SSH2…) and that will give us just our key but still that key is divided into 6 lines and we need it in one single line. So go now and make that a single line. If you don’t know how to do it in Notepad++ open Search and Replace by pressing CTRL+H and set search for \n, replace that with nothing, set search mode to Extended and click on Replace All. Here’s an screenshot to help you out with that:

The result should be a single line of code (if word wrapping is not turned on). Now before that just add rsa-ssh and one space after that word. The resulting key should look something like this:
rsa-ssh AAAAB3NzaC1yc2EAAAABJQAAAQEAkBUbfyu0amE+uld7dk9LJnJytmVf8qx4TBvT0jCYKfNKJj2io8Jh3gB5Lyqhk2xMmPfthn2d/uRbIESmxN3DNE8NbD5Wubr0Q15iihAkn0qpxV8HodTONiwGP5GhFJqEe0ThHVa8w13oah/UYqH/a40/N/LaOaTcMaC/V6hGQhCE+mCz5tmVsQm2CarNdWZffIYhHLDiSgd4DY609UKnA5LQAV1/cHK1FYVEqiKISpoNZBJ8a0ZOn/a98fVqv7BnxHwvszDJ7Kwusx3ejJVDN2EykfT+SMXSjehXLy7ytRW8a7xSHwxa8yR+7lAcdgyrQryWUfBvDce1hdpk1M4sOQ==
Now you need to copy that line of code into your ~/.ssh/authorized_keys. The absolute path is /root/.ssh/authorized_keys and you can edit that in any editor you like and just add that line below existing lines (or replacing some of your old/previous keys). You need to save the changes and you’re done! Now you can login to your droplet or your webserver with your private SSH Key.
GIT is popular version control system for software development and it’s really common today. Installation on servers without cPanel is pretty simple but on servers that do have cPanel can be tricky because git installs it’s own Perl libraries and that can cause many problems and conflicts and often results in unusable WHM server in the end.
So whatever you do – do not install GIT!
I repeat: DO NOT INSTALL GIT ON WHM SERVER!
Because it’s already installed 🙂
It’s just not in path and you can’t use it.
There are two ways of doing this:
1. WHM/root way that will make git available to all users on the system
2. cPanel way that will make git available only for the current account
Hot to enable it in WHM?
To make git usable to all users (with ssh access) just execute this single line of code as root:
ln -s /usr/local/cpanel/3rdparty/bin/git /usr/local/bin/git
How to enable it in cPanel?
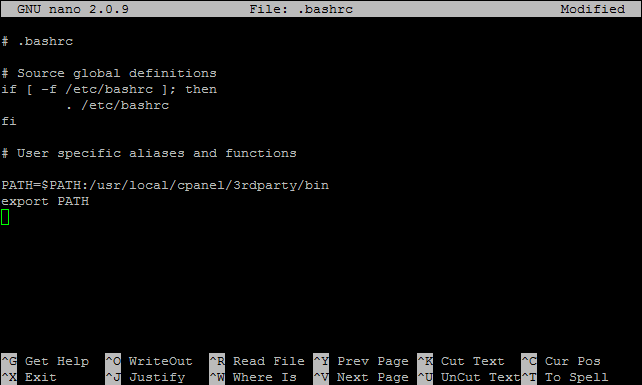
If you are using a shared (or reseller) hosting powered by cPanel (and you don’t have WHM access) than you need to login using SSH and locate your .bashrc file. It should be in your home directory. Open that file for editing and add git to your path by adding following two lines of code at the end of your .bashrc file:
PATH=$PATH:/usr/local/cpanel/3rdparty/bin
export PATH
To edit that file enter: nano .bashrc
After you add these two lines your .bashrc file should look like this:
To save the changes press CTRL+X , then press Y and Enter. In order for changes to be accepted it will be necessary to re-log in to your SSH command prompt.
How to check if git now works on cPanel?
Well, that’s really simple. Just login to SSH and execute: git –version
and that should return git version (currently cPanel git is version 2.6.1)
That’s it!
Nice and simple.
Happy giting…
I’ve seen numerous DigitalOcean vs Linode reviews but for some reason people always made these tests with the cheapest plans. For my review and my tests I’ve decided to use slightly bigger plans – with 8GB of RAM on both – and see what comes up. Both plans are priced at $80/month (billed hourly). Before we go take a quick note on the terminology: a DigitalOcean VPS is called a “droplet” while Linode’s one is called a “linode” 🙂
Offer
DigitalOcean offers:
– 8GB or RAM
– 4 CPU cores
– 80GB of SSD disk space
– 5TB of bandwidth
– 1Gbps network connection
Linode offers:
– 8GB of RAM
– 6 CPU cores
– 192GB of SSD disk space
– 8TB of bandwidth
– 1Gbps network connection
So clearly Linode offers more for the same price: more than a double of disk space, 2 more CPU cores and more bandwidth. This is probably due the fact that they have released their offer after DigitalOcean so that’s some healthy competition right there.
Hardware
Before we start let’s talk a bit about hardware used by those two companies. DigitalOcean at Amsterdam NL (AMS-3) droplets use Intel Xeon E5-2630L v2 at 2.4 GHz. On the other hand a Linode at London shows Intel Xeon E5-2680 v2 at 2.80GHz. So Linode should have a slightly better processor and should get more processing power for the same amount of money. Other than processor, there isn’t a way to detect the type of memory or SSD drives used.
Note: DigitalOcean at Netherland’s AMS-1 location “hides” their CPU model behind “QEMU Virtual CPU version 1.0” clocked at 2 GHz. So this is one more reason to choose AMS-3 over AMS-1.
Virtualization
DigitalOcean utilizes KVM virtualization while Linode uses Xen.
Control Panel
While DigitalOcean have a minimalist approach to their control panel it lacks some important functions: for example you can’t see how much bandwidth have you spent (not that they care since they do not charge if you go over the monthly limit), you can’t have more than one IP allocated to a single droplet, plan upgrades and downgrades can be really complex to do and time consuming creating a significant downtimes.
Linode is clearly more feature rich platform. They will provide you much better charts and more options. Their Control Panel is more geeky and their SSH in web console works much better and faster compared to one at DigitalOcean, you can buy and assign extra IPs to your linode, you will get an email if your linode is under high load and it can be even auto rebooted in case it hangs.
Aditional Services
DigitalOcean offers backups at the cost of +20% on the droplet monthly price. They also offer free DNS hosting and that’s about it. Linode offers backups (at the same price +20%) and free DNS hosting but beside that they also offer some interesting features like Monitoring, Load Balancing and Fully Managed Service (at $100/month per account for all liodes you have).
OS Choices
DigitalOcean offers CentOS, CoreOS, Debian, Fedora, Ubuntu as well as preinstalled applications (Ruby on Rails, WordPress, LAMP, LEMP, Django, MEAN, NodeJS, Ghost, GitLab, Docker, Drupal, Dokku, Magento, Redmine). Linode offers: Arch Linux, CentOS, Debian, Fedora, Gentoo, openSUSE, Slackware, Ubuntu but they also offer lot more settings when creating a new Linode (from partition setup to kernels).
Setup Time
DigitalOcean is clearly a winner: they will have your droplet created in 55 seconds and process is really easy. While the same thing on Linode takes few more minutes and is somewhere complicated: you first create a new linode and then deploy an OS while at DigitalOcean it’s done at once.
Geo Locations
At Linode you can deploy at United States (Dallas TX, Fremont CA, Atlanta GA and Newark NJ), United Kingdom (London) and Japan (Tokio) while Digital Ocean on the other hand offers droplets at United States (New York NY, and San Francisco CA), United Kingdom (London), Netherlands (Amsterdam) and Singapore. Linode has better offer of locations in US but they lack Netherlands as really important European location.
Uptime and Stability
I’ve been using DigitalOcean since Feb 2013 and I haven’t noticed any major downtime. In case of some works or scheduled maintenance they send on time emails and they really keep the downtime minimal. I’ve been using Linode for a few months and they also seem stable and reliable. So they are both stable and unlike many people claim that they would never host “mission critical” stuff on DigitalOcean for a reason, I’m doing exactly that since Feb 2013 without any problems. Even this site is hosted on DigitalOcean since then.
Support
In the start DigitalOcean support was really helpful bur recently the quality of their support is bit lower, but on the other hand they offer amazing amount of tutorials and really a helpful community. Linode is famous for their good support and I’ve also found really really helpful community on their IRC (almost like a unofficial live chat support).
Performance
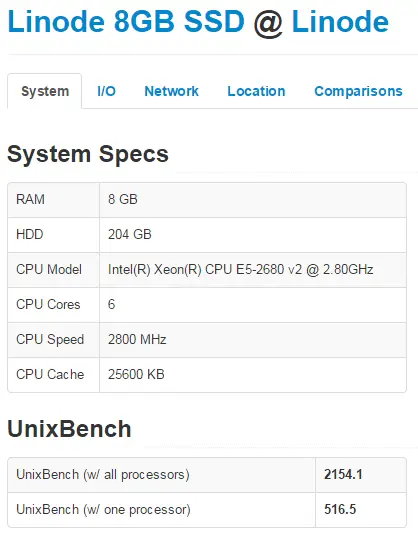
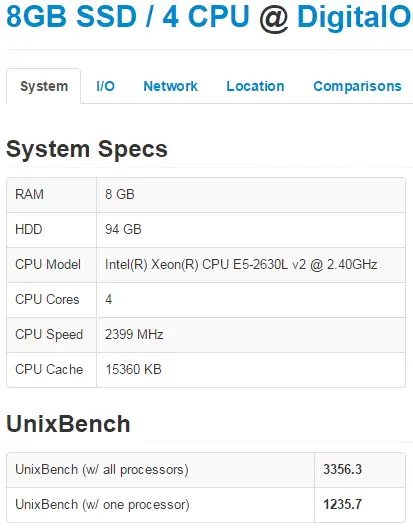
Linode should have better performance than DigitalOcean because of the more powerful processor and more cores available. But is faster? Well, actually no! I’ve used ServerBear’s benchmarks (one newly created CentOS 7 dorplet/linode) and here are the results I’ve got:
Linodes single core UnixBench score is 516.6 vs 1,235.7 for DigitalOcean. At a single core level a DigitalOcean is almost twice faster than Linode. This is really interesting and totally unexpected result!
But Linode has 6 cores and DigitalOcean has only 4 so it will be faster anyway, right? More cores means more power, right? WRONG!!!
Even though DigitalOcean has 50% less cores their total score is 50% better than Linode’s (2,154 compared to 3,356) meaning that every single DigitalOcean CPU core performs 100% faster than every single Linode’s core. And that’s another unexpected result! This is also very odd and might suggest that Linode is oversold or something but I’m really not sure.
If you don’t trust me take a look at the results your self:
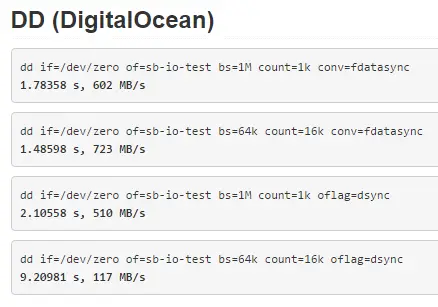
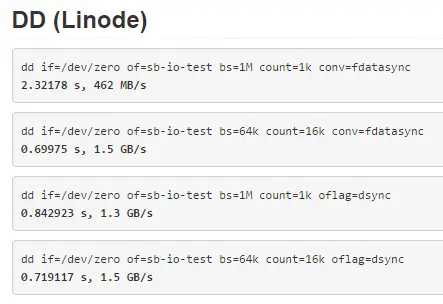
What about IO performance? Who’s got faster SSDs? My results show that read performance is pretty close while write performance almost twice faster on Linode:
DigitalOcean:
Timing cached reads: 16442 MB in 2.00 seconds = 8233.03 MB/sec
Timing buffered disk reads: 1070 MB in 3.00 seconds = 356.62 MB/sec

Linode:
Timing cached reads: 18408 MB in 1.98 seconds = 9298.57 MB/sec
Timing buffered disk reads: 2142 MB in 3.00 seconds = 713.35 MB/sec
But, ServerBear tests show that Linode IO is way much faster:
Network speeds are pretty close so we can call them even.
Complete Benchmark Results
Click on a links below for complete benchmark results:
– DigitalOcean: http://serverbear.com/benchmark/2014/11/29/GCJgYYuCapGFxUfV
– Linode: http://serverbear.com/benchmark/2014/11/29/bffAscAzM9j8mZSl
Conclusion
Things aren’t always as they might seem. Even Linode has slightly better processor and twice more cores my benchmark results showed that it’s not faster than DigitalOcean. In fact it’s almost 50% slower. On the other hand Linode IO performance of is twice (or more) times better than IO performance of DigitalOcean.
My Recommendation
Even both are really good hosting providers and they give a lot for the money I couldn’t say one host is better than another. But here are some general guidelines I came up with that might help you decide:
- If you need simple and cheap VPS to play around – DigitalOcean
- If you need fast CPU or you are hosting CPU intense application – DigitalOcean
- If you need to deploy WordPress, Drupal, Redmine, LAMP or LEMP application – DigitalOcean
- If you plan on serving lots of static content – Linode
- If you need lots of disk space – Linode
- If you need lots of geeky (*nix) functions – Linode
- If you like minimalist (Apple) approach – DigitalOcean
- If you want it managed and don’t mind paying extra $100/month – Linode
- If you need more than one IP – Linode
- If you need lots of bandwidth – Linode gives more but DigitalOcean doesn’t charge for overage 😉
- If you need to scale up (or down) your plan easily – Linode
In the end – whichever you pick – you’ll be happy with it since they are both really good virtual hosting providers. Compared to regular (non SSD powered) VPS hosts they are both really fast.