Logging in to your DigitalOcean droplets is more secure if you use SSH keys compared to using root password. Today, I had to add my key to existing droplet (running over 3 years now) and to a droplet I have just created and setup everything on it but forgot to add a SSH Key to it. And just for the record I’m using Windows computer at the moment and the key is generated by PuttyGen. You should already have your SSH key pair: private and public SSH key before you proceed with this guide. I know that doing the same thing on Mac (or Linux) is much easier and all you would have to do is just execute one line of code in Terminal, but again I’m currently using Windows and this tutorial is intended for Windows users. Also note that this same guide will also work in case you have a dedicated server or a VPS at any other provider.
So, how do you add a SSH key after creating a droplet? I went to numerous replays on DO community but haven’t found the correct answer. To make this work first you need to open your favorite text editor: Notepad++, Sublime, Atom any of these editors is just fine (as long you don’t use MS Word). Now copy/paste your public key text in it.
So here is how a Public Key looks like:
---- BEGIN SSH2 PUBLIC KEY ----
Comment: "rsa-key-20161012
AAAAB3NzaC1yc2EAAAABJQAAAQEAkBUbfyu0amE+uld7dk9LJnJytmVf8qx4TBvT
0jCYKfNKJj2io8Jh3gB5Lyqhk2xMmPfthn2d/uRbIESmxN3DNE8NbD5Wubr0Q15i
ihAkn0qpxV8HodTONiwGP5GhFJqEe0ThHVa8w13oah/UYqH/a40/N/LaOaTcMaC/
V6hGQhCE+mCz5tmVsQm2CarNdWZffIYhHLDiSgd4DY609UKnA5LQAV1/cHK1FYVE
qiKISpoNZBJ8a0ZOn/a98fVqv7BnxHwvszDJ7Kwusx3ejJVDN2EykfT+SMXSjehX
Ly7ytRW8a7xSHwxa8yR+7lAcdgyrQryWUfBvDce1hdpk1M4sOQ==
---- END SSH2 PUBLIC KEY ----
Please note that this is not my actual public key and I have generated this one just for the purpose of creating this post. So it’s useless and don’t use it for anything.
Now you need to get rid of first two lines (—- BEGIN SSH2… and Comment …) and the last line (—- END SSH2…) and that will give us just our key but still that key is divided into 6 lines and we need it in one single line. So go now and make that a single line. If you don’t know how to do it in Notepad++ open Search and Replace by pressing CTRL+H and set search for \n, replace that with nothing, set search mode to Extended and click on Replace All. Here’s an screenshot to help you out with that:

The result should be a single line of code (if word wrapping is not turned on). Now before that just add rsa-ssh and one space after that word. The resulting key should look something like this:
rsa-ssh AAAAB3NzaC1yc2EAAAABJQAAAQEAkBUbfyu0amE+uld7dk9LJnJytmVf8qx4TBvT0jCYKfNKJj2io8Jh3gB5Lyqhk2xMmPfthn2d/uRbIESmxN3DNE8NbD5Wubr0Q15iihAkn0qpxV8HodTONiwGP5GhFJqEe0ThHVa8w13oah/UYqH/a40/N/LaOaTcMaC/V6hGQhCE+mCz5tmVsQm2CarNdWZffIYhHLDiSgd4DY609UKnA5LQAV1/cHK1FYVEqiKISpoNZBJ8a0ZOn/a98fVqv7BnxHwvszDJ7Kwusx3ejJVDN2EykfT+SMXSjehXLy7ytRW8a7xSHwxa8yR+7lAcdgyrQryWUfBvDce1hdpk1M4sOQ==
Now you need to copy that line of code into your ~/.ssh/authorized_keys. The absolute path is /root/.ssh/authorized_keys and you can edit that in any editor you like and just add that line below existing lines (or replacing some of your old/previous keys). You need to save the changes and you’re done! Now you can login to your droplet or your webserver with your private SSH Key.
I have tried to setup Sublime Text 3 so I could run it on my new Mac from terminal just typing subl . but all the when I wanted to make the symlink I was getting this error: ln: /usr/local/bin/subl: No such file or directory all the time.
The problem is that I had no bin directory on that path. So to fix that you need to do the following:
cd /usr/local
sudo mkdir bin
Now we have that bin folder on /usr/local/bin path and now we can create the link using:
Sublime Text 3
sudo ln -s /Applications/Sublime\ Text.app/Contents/SharedSupport/bin/subl /usr/local/bin/subl
Sublime Text 2
sudo ln -s /Applications/Sublime\ Text\ 2.app/Contents/SharedSupport/bin/subl /bin/local/bin/subl
Exit the terminal and start it again and you should be able to use subl . to open all files in current folder in sublime text for editing.
Are you getting that blue screen (BSOD) with error message 0x0000007b when booting your computer or trying to install a new Windows operating system (on a computer with SSD drive)?
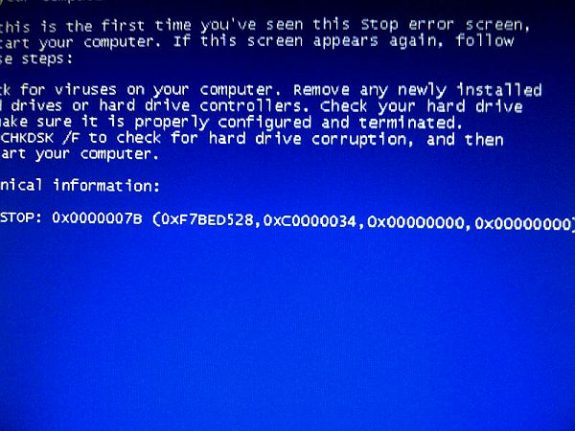
The problem is that in BIOS your SATA is set to AHCI instead of ATA. To fix this problem you’ll have to enter the BIOS and change it back and your system will function normally. This can happen if your BIOS data is lost or in some cases the BIOS batter is empty, or if you cleared bios by hand. Don’t worry none of your data is damaged in any of these cases.
Here’s how to fix this problem:
- Reboot your computer and keep pressing F12 to enter BIOS. On some laptops it’s F2 or F8 (it should be shown on your screen)
- Go to Advanced tab and change ACHI to ATA option under SATA Operation (it might have a different name depending on your BIOS).
- Save the changes and reboot.
That’s it!
Microsoft Windows applications developed using .NET Framework require Microsoft .NET Framework to be installed on computer that will run the application. Microsoft provides installer for .NET Framewework but by default it’s an online installer. That means that you basically download a small installer file that after it’s executed automatically connects to Microsoft servers and downloads the required components and completes the installation.
The online installers work great as long as you have internet conection. But some users don’t have an internet connection and that can be a problem. Sometimes developers require offline installer so they can ship it with the software inside software installation or on CD/DVD medium.
I have gathered a set of links of Microsoft .NET Framework offline installers and you can download full installation files from the following links:
.NET Framework 4.6 Setup
.NET Framework 4.5 Setup
.NET Framework 4.0 Setup
.NET Framework 3.5 Setup Service Pack 1
.NET Framework 3.5 Setup
.NET Framework 2.0 Setup
.NET Framework 1.0 Setup
.NET Framework Client Profile Offline Installer
If you run Windows 7, Windows 8 or Windows 8.1 you probably got an offer to upgrade to Windows 10 and you noticed that upgrade icon in task bar to your clock.

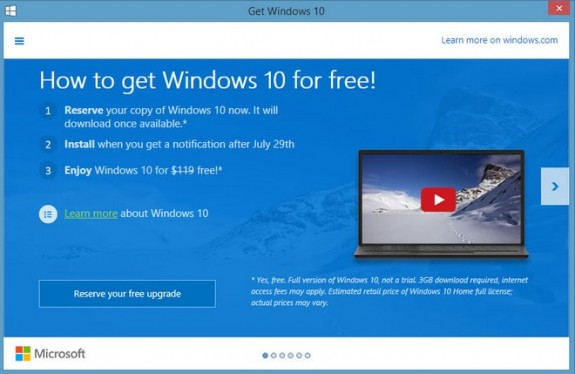
If you don’t want to upgrade to Windows 10 and you want to keep your current Windows and you’d like to get rid of that GWX.exe nag screen and taskbar icon run cmd as administrator by typing in cmd in start menu search and right clicking the Command Prompt result and clicking on Run as administrator and confirming that you want to run command prompt as admin.

When you get that black command prompt window just type (copy/paste) the following command and once it’s executed reboot your computer and Windows 10 upgrade will be gone. Out of many this is the only solution that actually worked for me!
reg add "HKLM\SOFTWARE\Policies\Microsoft\Windows\Gwx" /v DisableGwx /t REG_DWORD /d 00000001 /f
One more thing I also noticed is that even if you’re not interested in upgrade Microsoft still downloads entire Windows 10 installation and stores it in c:/$windows.~BT folder just in case you say “yes” to their upgrade offer. That folder can take from 2 to 3 GB of your disk space and it’s especially valuable if you have (a smaller) SSD as your primary hard drive. Removing the folder frees up the space but quickly (after a reboot) it starts downloading it again so it doesn’t just take your disk space but also uses your internet bandwidth. To stop it from doing that after you delete folder $windows.~BT create a new empty one with the same name and then right-click it and in folder properties make it Read Only. That way it will remain empty as Windows will not be able to download Windows 10 files and store them in it.

