How to disable xmlrpc.php?

While monitoring my system I have notices increased number of requests to xmlrpc.php. Every single of those requests took 200MB to 205MB of ram and resulted in system instability and in few occasions it caused my 8GB Digital Ocean Droplet to go out of memory and eventually crashed leaving all my sites not working for some 10hours or so.

Recently I’ve read that many hackers now use xmlrpc.php instead of wp-login.php to execute their brute force attacks. And the problem is – since WordPress 3.5 you can’t disable the use of xmlrpc, at least not from the WordPress control panel.

There are many ways to do that and I’ll write some:

1. Deleting xmlrpc.php file
This is really not recommended. Also after WordPress (auto)update the deleted file will be replaced so it’s not really smart to do this, but I just wanted to write this just in case someone doesn’t try to do this.

2. Plugins
There are several plugins that can do this. I found these two to be the most used ones: Disable XML-RPC and  XML-RPC Pinkback. Both plugins are really basic (only couple lines of code) but they should be able to help you out and protect your blog against those attacks.

3. Adding filter to theme functions.php file
This is basically same thing as the plugin above, but you have one plugin less. All you need to do is to edit your theme’s functions.php and add these couple of lines:

function remove_x_pingback($headers) {
    unset($headers['X-Pingback']);
    return $headers;
}
add_filter('wp_headers', 'remove_x_pingback');
add_filter('xmlrpc_enabled', '__return_false');

4. Block access at .htaccess
You can simply add this one line of code to your .htaccess file and block the access to the xmlrpc.php file entirely. User accessing the xmlrpc.php will get the 403 Forbidden error.

<Files xmlrpc.php>
Order Deny,Allow
Deny from all
</Files>

5. Blocking access in nginx
If you are running nginx instead of Apache you should add this code to your nginx configuration:

server {
    location = /xmlrpc.php {
        deny all;
    }
}

6. Block on entire server
If you have one server or VPS with tens of hundreds of WordPress installations (like me) any of the solutions above will take time to implement. So the best thing to do is to block access to xmlrpc.php file on Apache level, simply by adding this to httpd.conf file:

<FilesMatch "^(xmlrpc\.php)">
Order Deny,Allow
Deny from all
</FilesMatch>

Or even better adding this code (that also blocks wp-trackback.php and also prevent’s trackback hacking attempts).

<FilesMatch "^(xmlrpc\.php|wp-trackback\.php)">
Order Deny,Allow
Deny from all
</FilesMatch>

If you don’t use XML-RPC than you can safely disable it using any of the methods above (except the first one, of-course) and protect your blog against xmlrpc hacks.

How to install Munin monitoring on cPanel/WHM

Many people like to have some monitoring tool with lots of charts so they can track better how their server is performing. One of the best known tools for this is Munin: a free (open source) networked resource monitoring tool. Installation on WHM powered hosting is somewhat easy:

Munin


Continue Reading

RESTRICT_SYSLOG is disabled error at CSF

Few days ago I noticed the following error at CSF:
WARNING: RESTRICT_SYSLOG is disabled. See SECURITY WARNING in Firewall Configuration

CSF-Restrict-syslog-is-disabled

Here is easy solution how to solve this:

1. Login to WHM
2. Home > Plugins> ConfigServer Security & Firewall > Firewall Configuration
3. Set RESTRICT_SYSLOG to 3 (which is the default value), save and restart CSF

Thats it!

Windows cannot find “Computer Management.lnk”

I guess I drag ‘n’ drop Computer Management from Control Panel/Administrative Tools to desktop and then (later) deleted the icon from Desktop.

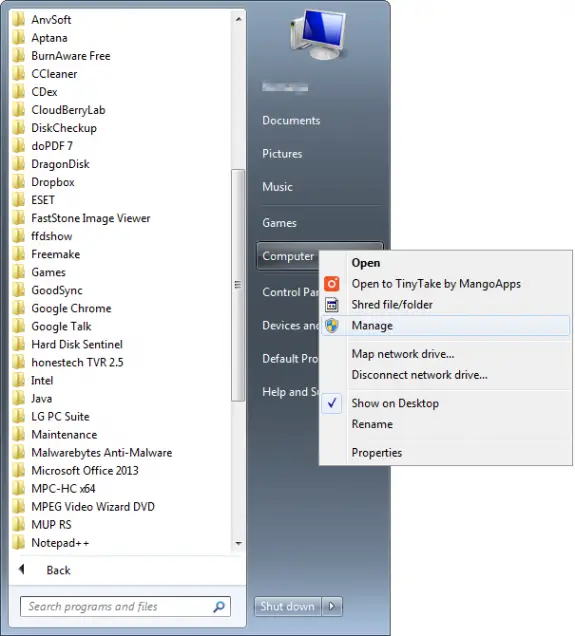
Now, when I go to Control Panel -> Administrative Tools icon Computer Management is missing and also when I want to start Computer Management by right clicking on Computer in start menu and selecting Mange (like on a picture below):

Manage Computer

I get the following error message: Windows cannot find ‘C:\ProgramData\Microsoft\Windows Start\Programs\Administrative Tools\Computer Management.lnk’. Make sure you typed the name correctly, and then try again.

Computer Management Link missing

The solution to this problem is to simply restore the missing link. To do so follow the following four steps:

1. Right click on blank area of Desktop and choose New -> Shortcut.
2. Type the following location in: %windir%\system32\compmgmt.msc /S and press Enter
3. Type a name for this article such as Computer Management. Click Finish.
4. Copy this shortcut and paste to C:\ProgramData\Microsoft\Windows\Start Menu\Programs\Administrative Tools folder.

Now the icon should be restored to Administrative Tools and you can access it by clicking Manage on Computer in Start Menu.

How to stop Wget Cron jobs creating log files in home directory?

If you’re using /usr/bin/wget to run your Cronjobs you might notice that every time that cron runs – wget will also creates a log file and will places in your home directory. If you run cron too often (every few minutes) it can add up very quickly and pretty soon you’ll end up with thousands of useless (junk) log files in your home directory. Also your disk space could get consumed especially if you’re on shared hosting or have limited amounts of disk space available. We don’t want anything of that.

Solution is pretty simple actually. All you need to do is add an extra parameter -O /dev/null

So your wget command would look something like this:

/us/bin/wget -O /dev/null http://www.script.com/script.php

This will tell to save output to /dev/null – meaning not to save it at all..
It’s as simple as that. Let me know in comments if this worked out!