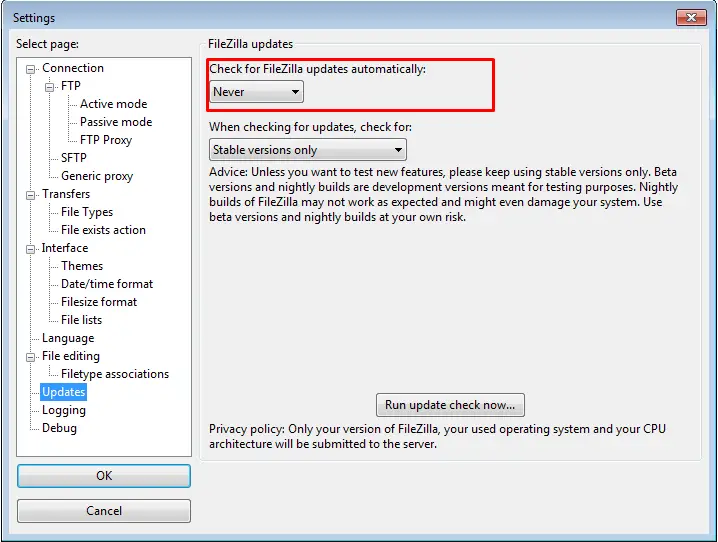
I use FileZilla a lot and I start it like ten times a day or even more. Every time it starts I get that screen that asks me to update FileZilla to latest version, but since I’m using portable version of it it’s almost impossible to do so since portable versions are often delayed etc. The same nag screen is there with the non-portable version of FileZilla and sometimes you simply don’t want to upgrade.
Disabling updates in settings simply doesn’t work and will remind you that there is an update even if this is disabled every time you start it.
To solve the problem first make sure that FileZilla is closed. Then locate it’s config file at: ..\appdata\roaming\filezilla\filezilla.xml or for portable version located at: ..\data\settings\filezilla.xml.
Open that file for editing (use some advanced editor like Notepad++ or Sublime) locate the line with value starting with: <Setting name=”Update Check New Version”> and delete that entire line.
Save the changes. And that’s it. Now you can use your FileZilla (or FileZilla Portable) without that update nag screen and you can choose whether you want to update it and when.
It is known that wp-cron.php file can cause high CPU usage on high traffic WordPress sites. This can also occur on sites hosted on shared or VPS hosting when they receive more traffic than usual at short period of time (traffic spikes).
Typically, every page load calls wp-cron.php to be executed and to run any tasks that are scheduled to be executed (like posting scheduled posts, plugin or theme updates, clearing caches on various caching plugins, sending email notifications etc). This basically asks WordPress: Is it time do do anything now?And then WordPress checks for pending tasks and if there’s nothing to do typically answers with: sorry, but there’s nothing to to at this moment… Try a bit later… and this probably happens in 99% cases. So this wp-cron.php literally nags WordPress all the time with those requests. On low traffic sites, this is perfectly fine but on high traffic sites (or sites with traffic spikes) this can cause higher resource usage, make problems with your hosting (vps/server) and decrease your site performance.
Best way to prevent this wp-cron.php activity is to stop it from running the default way (on every site visit) and then just run it using cron when according your needs.
To stop WordPress from executing wp-cron.php after every page visit, simply add this single line to the end of your wp-config.php file:
define('DISABLE_WP_CRON', 'true');
That’s it! This will lower the CPU/resource usage instantly. But it’s not recommended to never execute wp-cron.php since your WordPress plugins and themes won’t be updated and your scheduled posts won’t be posted etc.
Here is the commands that you can use to run wp-cron.php using a real cron:
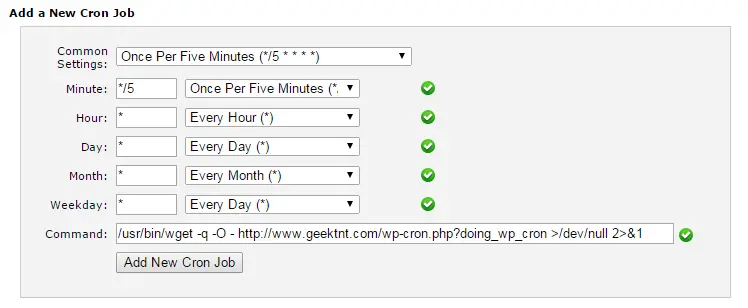
There’s no general rule as for the frequency of this cronjob since every site and setup is different. Everything from once per day to every minute is fine but it really depends on your system. If you have tasks that run every 10 or 15 minutes you should probably setup cron to run every 5 minutes. It’s still quite frequent but it won’t happen that you get several cron runs in couple of seconds.
To setup cron at cPanel hosted site login at cPanel, click on Cron Jobs icons and there add a new cronjob like this:
Compressing data like html, js, css before transmitting them to the visitors can speed up your sites and save you bandwidth. Recently I have updated Apache on one server from version 2.2 to 2.4 but my mod_deflate rules won’t work any more (because of changes in the new version of Apache).
Here are my old mod_deflate rules I used on Apache 2.2:
Nice and easy! You can add other extensions you do not want to compress to the list above and that should be it!
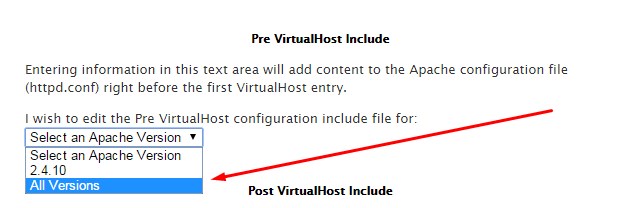
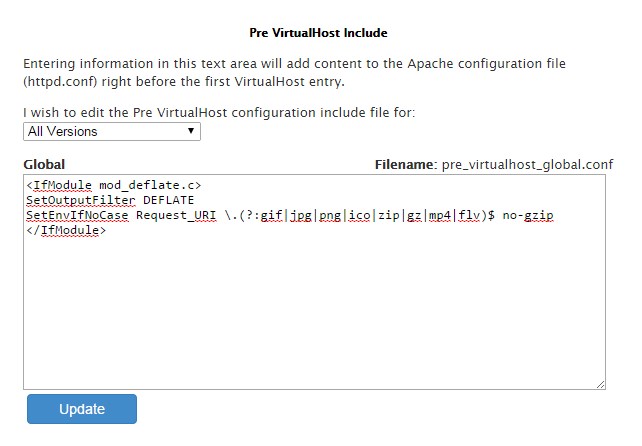
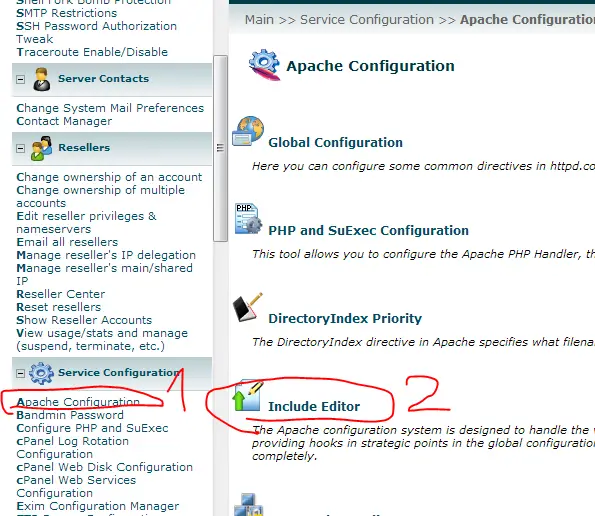
cPanel/WHM users should login to WHM then go to Service Configuration -> Apache Configuration -> Include Editor then locate Pre VirtualHost Include on the page and select All Versions from the list (or current version of the Apache in my case 2.4.10).
Then simply copy paste the code above into the box, save and restart the Apache service.
Note: The process is same for Apache 2.2 just use the appropriate code from above.
Streaming MP4 files with Apache + h264_streaming has never been easier. Setup your web server to stream MP4 files using Apache in just 3 minutes.
cd /usr/local/src
wget http://h264.code-shop.com/download/apache_mod_h264_streaming-2.2.7.tar.gz
cd mod_h264_streaming-2.2.7
./configure --with-apxs='which apxs'
make && make install
Non WHM/cPanel users
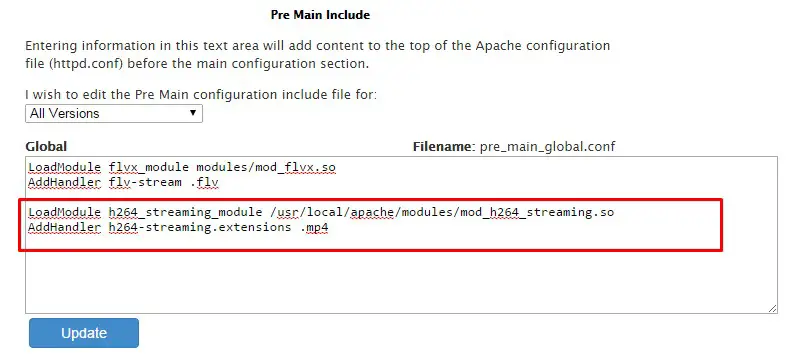
Should now add those two lines into httpd.conf:
WHM/cPanel users
Should use Include Editor since any changes made to httpd.conf will be lost in case of rebuilding apache.
So login to WHM and go to Apache Configuration -> Include Editor -> Pre Main Include -> All Versions and in the box that appears copy/paste following two lines and after saving that confirm Apache restart.
I’ve seen numerous DigitalOcean vs Linode reviews but for some reason people always made these tests with the cheapest plans. For my review and my tests I’ve decided to use slightly bigger plans – with 8GB of RAM on both – and see what comes up. Both plans are priced at $80/month (billed hourly). Before we go take a quick note on the terminology: a DigitalOcean VPS is called a “droplet” while Linode’s one is called a “linode” 🙂
Offer
DigitalOcean offers:
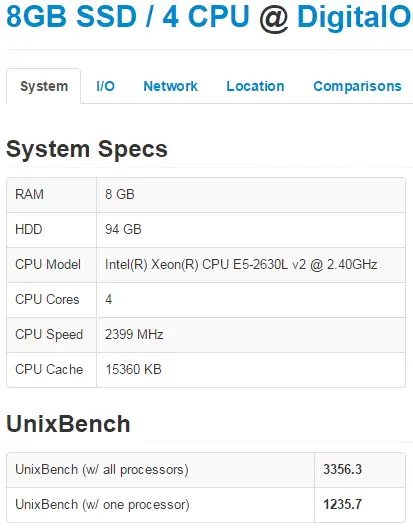
– 8GB or RAM
– 4 CPU cores
– 80GB of SSD disk space
– 5TB of bandwidth
– 1Gbps network connection
Linode offers:
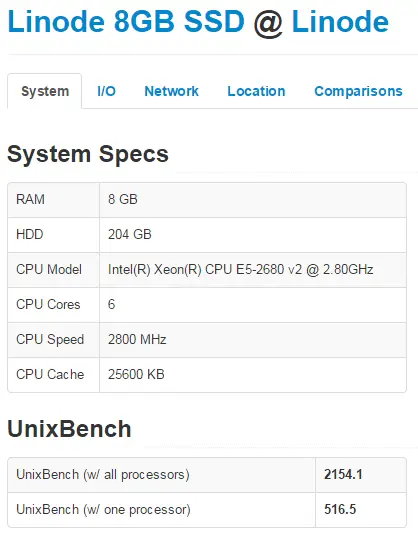
– 8GB of RAM
– 6 CPU cores
– 192GB of SSD disk space
– 8TB of bandwidth
– 1Gbps network connection
So clearly Linode offers more for the same price: more than a double of disk space, 2 more CPU cores and more bandwidth. This is probably due the fact that they have released their offer after DigitalOcean so that’s some healthy competition right there.
Hardware
Before we start let’s talk a bit about hardware used by those two companies. DigitalOcean at Amsterdam NL (AMS-3) droplets use Intel Xeon E5-2630L v2 at 2.4 GHz. On the other hand a Linode at London shows Intel Xeon E5-2680 v2 at 2.80GHz. So Linode should have a slightly better processor and should get more processing power for the same amount of money. Other than processor, there isn’t a way to detect the type of memory or SSD drives used.
Note: DigitalOcean at Netherland’s AMS-1 location “hides” their CPU model behind “QEMU Virtual CPU version 1.0” clocked at 2 GHz. So this is one more reason to choose AMS-3 over AMS-1.
Virtualization
DigitalOcean utilizes KVM virtualization while Linode uses Xen.
Control Panel
While DigitalOcean have a minimalist approach to their control panel it lacks some important functions: for example you can’t see how much bandwidth have you spent (not that they care since they do not charge if you go over the monthly limit), you can’t have more than one IP allocated to a single droplet, plan upgrades and downgrades can be really complex to do and time consuming creating a significant downtimes.
Linode is clearly more feature rich platform. They will provide you much better charts and more options. Their Control Panel is more geeky and their SSH in web console works much better and faster compared to one at DigitalOcean, you can buy and assign extra IPs to your linode, you will get an email if your linode is under high load and it can be even auto rebooted in case it hangs.
Aditional Services
DigitalOcean offers backups at the cost of +20% on the droplet monthly price. They also offer free DNS hosting and that’s about it. Linode offers backups (at the same price +20%) and free DNS hosting but beside that they also offer some interesting features like Monitoring, Load Balancing and Fully Managed Service (at $100/month per account for all liodes you have).
OS Choices
DigitalOcean offers CentOS, CoreOS, Debian, Fedora, Ubuntu as well as preinstalled applications (Ruby on Rails, WordPress, LAMP, LEMP, Django, MEAN, NodeJS, Ghost, GitLab, Docker, Drupal, Dokku, Magento, Redmine). Linode offers: Arch Linux, CentOS, Debian, Fedora, Gentoo, openSUSE, Slackware, Ubuntu but they also offer lot more settings when creating a new Linode (from partition setup to kernels).
Setup Time
DigitalOcean is clearly a winner: they will have your droplet created in 55 seconds and process is really easy. While the same thing on Linode takes few more minutes and is somewhere complicated: you first create a new linode and then deploy an OS while at DigitalOcean it’s done at once.
Geo Locations
At Linode you can deploy at United States (Dallas TX, Fremont CA, Atlanta GA and Newark NJ), United Kingdom (London) and Japan (Tokio) while Digital Ocean on the other hand offers droplets at United States (New York NY, and San Francisco CA), United Kingdom (London), Netherlands (Amsterdam) and Singapore. Linode has better offer of locations in US but they lack Netherlands as really important European location.
Uptime and Stability
I’ve been using DigitalOcean since Feb 2013 and I haven’t noticed any major downtime. In case of some works or scheduled maintenance they send on time emails and they really keep the downtime minimal. I’ve been using Linode for a few months and they also seem stable and reliable. So they are both stable and unlike many people claim that they would never host “mission critical” stuff on DigitalOcean for a reason, I’m doing exactly that since Feb 2013 without any problems. Even this site is hosted on DigitalOcean since then.
Support
In the start DigitalOcean support was really helpful bur recently the quality of their support is bit lower, but on the other hand they offer amazing amount of tutorials and really a helpful community. Linode is famous for their good support and I’ve also found really really helpful community on their IRC (almost like a unofficial live chat support).
Performance
Linode should have better performance than DigitalOcean because of the more powerful processor and more cores available. But is faster? Well, actually no! I’ve used ServerBear’s benchmarks (one newly created CentOS 7 dorplet/linode) and here are the results I’ve got:
Linodes single core UnixBench score is 516.6 vs 1,235.7 for DigitalOcean. At a single core level a DigitalOcean is almost twice faster than Linode. This is really interesting and totally unexpected result!
But Linode has 6 cores and DigitalOcean has only 4 so it will be faster anyway, right? More cores means more power, right? WRONG!!!
Even though DigitalOcean has 50% less cores their total score is 50% better than Linode’s (2,154 compared to 3,356) meaning that every single DigitalOcean CPU core performs 100% faster than every single Linode’s core. And that’s another unexpected result! This is also very odd and might suggest that Linode is oversold or something but I’m really not sure.
If you don’t trust me take a look at the results your self:
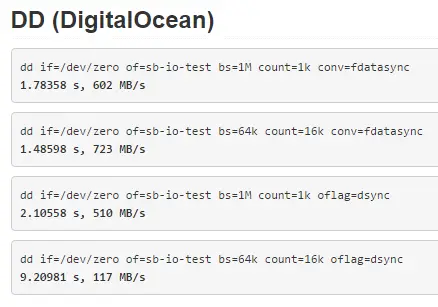
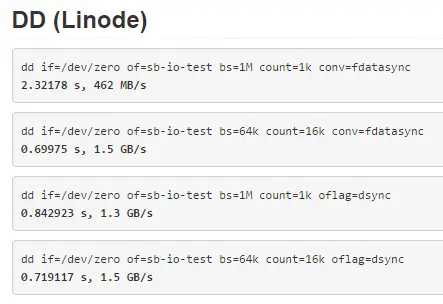
What about IO performance? Who’s got faster SSDs? My results show that read performance is pretty close while write performance almost twice faster on Linode:
DigitalOcean:
Timing cached reads: 16442 MB in 2.00 seconds = 8233.03 MB/sec
Timing buffered disk reads: 1070 MB in 3.00 seconds = 356.62 MB/sec

Linode:
Timing cached reads: 18408 MB in 1.98 seconds = 9298.57 MB/sec
Timing buffered disk reads: 2142 MB in 3.00 seconds = 713.35 MB/sec
But, ServerBear tests show that Linode IO is way much faster:
Network speeds are pretty close so we can call them even.
Conclusion
Things aren’t always as they might seem. Even Linode has slightly better processor and twice more cores my benchmark results showed that it’s not faster than DigitalOcean. In fact it’s almost 50% slower. On the other hand Linode IO performance of is twice (or more) times better than IO performance of DigitalOcean.
My Recommendation
Even both are really good hosting providers and they give a lot for the money I couldn’t say one host is better than another. But here are some general guidelines I came up with that might help you decide:
If you need simple and cheap VPS to play around – DigitalOcean
If you need fast CPU or you are hosting CPU intense application – DigitalOcean
If you need to deploy WordPress, Drupal, Redmine, LAMP or LEMP application – DigitalOcean
If you plan on serving lots of static content – Linode
If you need lots of bandwidth – Linode gives more but DigitalOcean doesn’t charge for overage 😉
If you need to scale up (or down) your plan easily – Linode
In the end – whichever you pick – you’ll be happy with it since they are both really good virtual hosting providers. Compared to regular (non SSD powered) VPS hosts they are both really fast.